

NOTE 1: The above structural upgrades (blue UHMW-PE, aluminum sheet, carbon fiber, black acetal) are recommendations only. If you want a Tri-Cell for a 12" Mirror fitted to a 16" Tube diameter (12M/16T) with [say] a 20M/24T Tri-Cell structural upgrade (blue UHMW-PE/carbon fiber layer x 2), it will simply cost the same as Item TC20 above. The added cost for materials and much longer triangle fabrication time (at $100 per hour machine shop time) depends on the individual upgrade package you select. Tri-Cell physical dimensions are not a critical cost consideration. To reiterate, you can have all the structural [center triangle] upgrades you want for a smaller Tri-Cell, but you have to pay the price for the extra (very expensive) materials and much longer fabrication times.
NOTE 2: Universal Tri-Cells can be custom fitted and assembled to fit any size Mirror or Tube by sizing the lengths of the 3/4" stainless steel (SS) threaded rods and, if applicable, sizing the black acetal (Delrin) sleeves for the larger diameters. However, a 12M/16T Tri-Cell can't be user "adjusted" to become an 18M/22T Tri-Cell and vise versa.
NOTE 3: All six Tri-Cell recommendations above (TC12 TC14 TC15 TC16 TC18 TC20) provide 2 inches of Mirror-to-Tube clearance. That said, I offer the following for your edification. A 12" primary Mirror should have at least 1 inch of clearance between your primary Mirror and the ID of your scope's Tube. A 14" primary Mirror should have at least 1.5 inches and a 16 to 20" primary Mirror should have at least 2 inches of clearance. This is not simply a VSI spider/cell mounting requirement. This is to prevent your Tube's internal eddy currents and turbulence from interfering with your incoming parallel light path and distorting your images. Paul's "rule of thumb" says that for every foot of primary Mirror diameter, you require a minimum 1 inch clearance around your primary Mirror. More is always better. To clarify, a 12" Mirror should have a minimum 14" ID Tube, 20" Mirrors should have a minimum 24" ID Tube and 30" Mirrors should have a minimum 36" ID Tube, etc.
I reference a 30" Mirror because my 30" Cassegrain at Black Forest Observatory had a 36" Tube diameter, and it still had problems with Tube currents, and it had an open Mirror cell design like my Tri-Cells. FYI, all my products were once prototypes that were heavily beta tested at my observatory under real night sky conditions. Most were found to be wanting. In production, I have tried to eliminate all the "wantings" so you can receive a near-perfect product, and experience none of the frustrations encountered by others. - PBVS


A UNIVERSAL Mirror Cell for Newts & Cassegrains from 12 to 20 inches (larger by custom order).
Conventional design (pictured directly above) or VSI's exclusive Mirror-cell design (pictured below).
Your choice of Mirror-cell design, but smaller Mirrors are supported better with conventional cells.
Most commercial Mirror cells fit one size Mirror and Tube only - VSI Tri-Cells adjust to many sizes.
VSI Tri-Cell's unique design properly supports your Mirror from a simple, single rigid platform.
Tri-Cells have 9-point flotation with 6-point lateral Mirror support and 3 clips to secure your Mirror.
Aerospace Composites, Military Spec Stainless Steel and Aircraft-Grade 6061-T6 Aluminum construction.

TRI-CELL Features & Specifications:
Built from a 1.5" thick, solid block (cut triangular) of Ultra High Molecular Weight Polymer (UHMW-PE)
UHMW-PE (blue) is filled with glass fiber increasing tensile and mechanical strengths to the level of aluminum
Carbon fiber and/or aluminum sheet is bonded to UHMW-PE to increase rigidity beyond aluminum
Simple cell design eliminates [redundant] Mirror holding enclosure - fixed platform goes directly to [zero tolerance] flotation system
Tube threaded rods are solid 3/4"-10tpi NC stainless steel (SS) reinforced with 1.5" dia. black acetal (Delrin) sleeves, if applicable
Adjustable [Mirror collimating] threaded SS rods are a 3/4"-16tpi NF fine thread
Unique TRUE compression mechanism that clamps around the collimating knob threads - no nuts to tighten/loosen
Zero tolerance isosceles triangles (3) provide center flotation points with 10 degree tilt/float angle in all directions
Nine cork pads and six 1/2" Nylon screws (w/locking nuts) securely lock your primary Mirror in place
Three aluminum Mirror clips, with gray felt pads, protect your Mirror's coating and edges from chipping
Large 3" diameter aluminum collimation knobs (3) with aluminum compression clamping knobs - no plastic knobs, no tools needed
Aircraft-grade 6060-T6 aluminum (NAS620 or AN960 aeronautics specs) or better
Military specification 18-8 stainless steel (MS15795, MS27183 or ASTM A693) or better
Primary Mirror (standard) thickness range = 1.5" to 2.75" (extended range available)
Center of Tube bolt to bottom of your primary Mirror = 1" min, 2" max (adjustable range)
Mounting hole diameter = 3/8" to 1/2" x 3 (SS button head bolt is 3/8"-16tpi NC)
Mounting bolt holes are opposed by 120 degrees x 3
Adjustable collimation range = 1"
Tri-Cell weight = 12 lbs. (TC16)
 Introducing VSI's Universal
Tri-Cells. "Universal" means that each of the four configurations
listed above are adjustable for primary Mirror diameter/thickness and Tube
diameter/thickness within a plus/minus adjustment range of approximately
one inch, unless you opt for our conventional mirror cell design. Conventional
designed mirror cells are usually for smaller mirrors because the support
platform provides better point contact.
Introducing VSI's Universal
Tri-Cells. "Universal" means that each of the four configurations
listed above are adjustable for primary Mirror diameter/thickness and Tube
diameter/thickness within a plus/minus adjustment range of approximately
one inch, unless you opt for our conventional mirror cell design. Conventional
designed mirror cells are usually for smaller mirrors because the support
platform provides better point contact.
The only size exception is the 12M/16T (Item TC12, pictured left) which only has a plus adjustment range on the Mirror size. No minus because of the smaller application parameters using a large 12" equilateral (on all sides) triangle as a minimum standard for all Tri-Cells. In other words, my production Tri-Cells will not accept a Mirror smaller than 12 inches in diameter, period. Of course, smaller custom sizes will always be considered, but custom-built pricing will also apply.
The simple, open design of the VSI Tri-Cell completely eliminates the conventional Mirror holding enclosure. The reason? It's never been done before, and the inclusion of this [now redundant] cell holding structure can restrict air flow around your primary Mirror. The 9-point flotation is supported directly from the fixed triangular platform. This exclusive (need I also say the "R" word, again?) design allows better air flow around your Mirror and inside your Tube to temperature stabilize your primary Mirror in a fraction of the time compared to pot-metal Mirror cells on the market today. Even if you have an open truss Tube, a restricted Mirror cell can drastically slow your Mirror's stabilization. With conventional closed [restricted air flow] mirror cells, the "space seagulls" will frustrate and waste your valuable observing/imaging time.
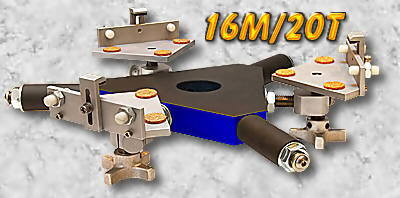
Note that the large 12" triangle on the 12M/16T (above left) needs no black acetal (Delrin) sleeves (as pictured on the 16M/20T below right) because the center equilateral triangle is nearly the size of the Tube diameter. Since the 3/4"-10tpi stainless steel (SS) threaded rods extend nearly all the way through the triangle (on all models), structural rigidity and flexure for the smaller sized primary Mirrors and Tube diameters (M/Ts) is not an issue. Also note that the top triangle surface of the 12M/16T (pictured above left) is not carbon fiber bonded. It is simply coated with a textured black finish that bonds to polymer resins. However, the bottom is bonded aluminum sheet which is only offered on the two 14M/18Ts (Items TC14 and TC15). The 12M/16T, with one aluminum sheet, is illustrated in this config for reference/expedient considerations only. The 12M/16T has no need for the structural aluminum sheet upgrade because of its smaller diameter and lower leveraged/extended structural stresses.
 The differences between the 12M/16T (pictured upper left) and the 16M/20T
(pictured right) are subtle, except for the color, but obvious with closer
examination. First inspection, you will notice that the massive equilateral
center triangles look larger on the white
and smaller on the
blue. They are not. They are identical
in size, but not composition. The
white (or natural cream colored)
triangle is solid Ultra High Molecular Weight Polymer (UHMW-PE) with no
additives. The deep blue triangle
is also UHMW-PE filled with glass fiber and blue
dye so there can be no mistake as to the content/quality of
the material. The fiberglass fill adds a much higher tensile strength and
dimensional stability to the UHMW-PE. The larger diameters impose a (mentioned
above) higher leveraged/extended structural stress on the equilateral triangle
itself.
The differences between the 12M/16T (pictured upper left) and the 16M/20T
(pictured right) are subtle, except for the color, but obvious with closer
examination. First inspection, you will notice that the massive equilateral
center triangles look larger on the white
and smaller on the
blue. They are not. They are identical
in size, but not composition. The
white (or natural cream colored)
triangle is solid Ultra High Molecular Weight Polymer (UHMW-PE) with no
additives. The deep blue triangle
is also UHMW-PE filled with glass fiber and blue
dye so there can be no mistake as to the content/quality of
the material. The fiberglass fill adds a much higher tensile strength and
dimensional stability to the UHMW-PE. The larger diameters impose a (mentioned
above) higher leveraged/extended structural stress on the equilateral triangle
itself.
Digging deeper into the rigid "heart" of the Tri-Cell, we find that the UHMW-PE is an ideally constructed material with a super-structure of macromolecules composed of repeating structurally stable compounds connected by covalent chemical bonding. Sounds really cool! But did you really need to know that?
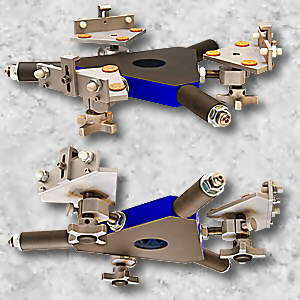
 Moving on, you will see that the
blue triangle has black acetal (Delrin)
thick-wall sleeves (like a very long/thick washer) over the ends of the SS
threaded rods going to the Tube. These ultra-hard, extreme impact resistant,
Delrin sleeves provide a combination of extremely high physical and mechanical
properties to the three structural support arms, greatly enhancing the rigidity
of those leveraged and extended loads on the larger diameter installations.
Moving on, you will see that the
blue triangle has black acetal (Delrin)
thick-wall sleeves (like a very long/thick washer) over the ends of the SS
threaded rods going to the Tube. These ultra-hard, extreme impact resistant,
Delrin sleeves provide a combination of extremely high physical and mechanical
properties to the three structural support arms, greatly enhancing the rigidity
of those leveraged and extended loads on the larger diameter installations.
As an interest point, I use Delrin spur gears in all my motorized TOADS because they last 10 times longer than metal, and the vibration transfer, from the [vibrating] motor to the focuser, is much lower. I find that in many structural applications, weight considerations and wear environments, metal is not always the best material. But you must use it sparingly, and only in applications where it will equal or surpass the strength of metal. Weight is also a necessary consideration because aluminum is extremely heavy compared to most polymers.
You may think that I am using alternate materials (not metal) because they are much cheaper. Not so! Plates of this UHMW-PE cost almost as much as 6061-T6 aluminum plate. FYI, an equivalent size UHMW-PE plate, large enough to cut three 12" triangles out of the plate, has a base price over $150, not including shipping and/or tax. Some even apply the lesser/cheaper (plumbing) polymers to their products exclusively, with [what my clients consider to be] disasterous results.
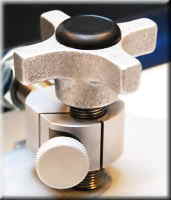
The close-up picture (left above) shows the black acetal sleeve removed from the 3/4" SS threaded rod. By removing the smaller button head 3/8" SS Allen bolt and two washers from the end of the internally tapped 3/4" threaded rod, and then removing the larger 3/4" nut and washer, you can simply slide the sleeve off the threaded rod. Of course, the three button head bolts go through your Tube's holes using one SS washer on the outside and one on the inside. Since the standard 3/8"-16tpi NC button head bolts (included) are 1" long, you can have a Tube wall-thickness of up to 3/4" before you need to install longer bolts, which are readily available from any hardware store.
This is also how you fine-adjust the overall diameter of the Tri-Cell. By removing this sleeve, you can simply turn the 3/4" SS threaded rod in or out by hand. This diameter is pre-set at VSI to your Tube specs, but this dimension may be a little too tight or loose, so you should test the Tri-Cell's fit (and hole alignment) before installing your primary Mirror, and fine adjust accordingly. Of course, with the smaller sizes, that have no black acetal sleeves, you simply loosen the large 3/4" nut to fine adjust the Tri-Cell rod lengths. This is included in the instructions that come with your Tri-Cell so I am rattling on a little here, but this type of pre-purchase information can save time when you finally receive your Tri-Cell, because "we" never read the instructions anyway. However, I should say that reading these instructions could actually be helpful because I've put a fair amount of time and thought into creating them.
 I haven't talked about the infamous Carbon Fiber yet, so before we move on
to the "second level" of collimatable Mirror stuff, I need to talk about
the aerospace/speed racer applications of this material. As you know, carbon
fiber molded structures are installed on the leading edge of the space shuttle's
wing (that carbon-carbon stuff) and the newest Boeing 787's are mostly
constructed from carbon fiber instead of that "heavy" aircraft-grade 6061-T6
aluminum. And, if you don't have carbon fiber in your race car, you will
never win the race.
I haven't talked about the infamous Carbon Fiber yet, so before we move on
to the "second level" of collimatable Mirror stuff, I need to talk about
the aerospace/speed racer applications of this material. As you know, carbon
fiber molded structures are installed on the leading edge of the space shuttle's
wing (that carbon-carbon stuff) and the newest Boeing 787's are mostly
constructed from carbon fiber instead of that "heavy" aircraft-grade 6061-T6
aluminum. And, if you don't have carbon fiber in your race car, you will
never win the race.
The carbon fiber, bonded to one side of the 18M/22T and both sides of the 20M/24T, reduces the [almost immeasurable] flexure of the blue UHMW-PE effectively to zero (see picture at right), as far as our applications are concerned. Understand that the flexure of the smaller diameter (no carbon fiber bonding, no glass fiber fill, white UHMW-PE) is also near-zero (nothing is absolute zero) because the stresses are not leveraged and/or extended, like on the larger diameter Tri-Cells. So, all model Tri-Cells are created equal, and relatively flexure-free. In other words, the measurable near-zero flexure of the smaller Tri-Cells is commensurate with the flexure of the larger Tri-Cells simply because of the increasing structural integrity of the additional materials (i.e. fiberglass fill, aluminum sheet, carbon fiber, black acetal, etc.) as the Tri-Cells increase in size. The process of bonding the carbon fiber to the blue substratum is similar to applying laminate to a countertop. My "super-secret" adhesive provides a bond where the two materials are fused at the molecular level. Meaning that this bond could not be broken by any physical means without destroying one or the other material. Enough information! I've already said too much about my "top-secret" bonding process. After the carbon fiber is bonded to the blue stuff, the larger cut-size of the carbon fiber is diamond ground to a precision beveled edge, as shown in the picture above right.
 Moving on to the floating isosceles triangles, collimatable parts and (all
stainless steel and aluminum) mechanisms, the first to depart the giant
fixed equilateral triangle via another 3/4"-10tpi threaded SS rod, is the
90 degree compression hub, fully machined from a solid block of aircraft-grade
6061-T6 aluminum (pictured at left). This (difficult and time consuming to
machine) precision hub is tapped and pinned from the triangle side to a
3/4"-10tpi threaded SS rod, the length of which is determined by your primary
Mirror's diameter. Simply change the length of the threaded rod and you change
the size of the Mirror that the Tri-Cell will accept.
Moving on to the floating isosceles triangles, collimatable parts and (all
stainless steel and aluminum) mechanisms, the first to depart the giant
fixed equilateral triangle via another 3/4"-10tpi threaded SS rod, is the
90 degree compression hub, fully machined from a solid block of aircraft-grade
6061-T6 aluminum (pictured at left). This (difficult and time consuming to
machine) precision hub is tapped and pinned from the triangle side to a
3/4"-10tpi threaded SS rod, the length of which is determined by your primary
Mirror's diameter. Simply change the length of the threaded rod and you change
the size of the Mirror that the Tri-Cell will accept.
Attached to the large 3" diameter collimating aluminum knob, pictured at left and below right, is another 3/4" threaded SS rod that is fine threaded through the hub at a 90 degree angle. But this is not the 10tpi NC thread that is used in all previous applications. It is a 16tpi NF fine thread that controls precise, exacting ultra-fine collimation of your primary Mirror.
This fine collimation mechanism does not have a locking nut, like other cells and spiders on the market. The hub has a compression clamp that locks the 3/4"-16tpi NF fine threaded rod in place by another smaller aluminum knob that operates perpendicular to the large 3" collimation knob (see both pictures left above and right below).
Even my spiders (see SPIDERS link) don't use locking nuts. Although they do have locking nuts between the fixed disk and the collimatable disk, I never recommend tightening them, because the extremely strong die spring applies so much pressure to the collimating disk that it is simply not necessary. I will always try to find a way to avoid using frustrating nuts in optical collimation devices. In designing my spiders, it was the application of very strong die springs, etc. that eliminated the tightening of the redundant nuts. In designing my new Tri-Cells, it is a compression mechanism that eliminated the use of nuts altogether and saved valuable profile and clearance too.
I must stop here to explain the disadvantages of a nut locking mechanism/device. After many decades of experience using other people's optical alignment devices, I found that a locking nut causes your alignment to change when you finally tighten it because it pulls on the threaded rod/bolt/screw moving it slightly toward the nut itself. This ruins the alignment of your perfectly collimated Mirror position, that you painstakingly achieved before you tightened the nut(s). Ah, if you tighten the other two (or three) collimation nuts equally, this should bring the Mirror back into perfect alignment. Right? Nuts! Wrong! At least my alignment nuts never worked right for me. Clean thoughts please! The 5 or 10 thousandths of an inch of inaccurate thread clearance, that all low-tolerance nuts/bolts/screws have, causes a sloppy fit and destroys your "perfect" alignment. And we all know how picky we are when it comes to optical alignment. We probably spend a large percentage of our telescope fun time confirming that our optics are "perfectly" aligned using our precision eyeball or some sort of laser device.
 Back on subject, the other end of the big 3" knob with the 3/4"-16tpi NF
fine threaded rod, is where the "magic" happens. It is where the floating
isosceles triangle "attaches" to the end of the fine threaded rod (see picture
at right). If this floating connection can't provide zero tolerance and still
float, then this simple design will not "float your boat." In other words,
you need to go back to a conventional Mirror cell design, without bypassing
the Mirror holding cell, like I did. Do not go directly to the three floating
triangles, from the fixed platform (aka big
blue triangle), if this connection
isn't zero tolerance and still able to float 360 degrees.
Back on subject, the other end of the big 3" knob with the 3/4"-16tpi NF
fine threaded rod, is where the "magic" happens. It is where the floating
isosceles triangle "attaches" to the end of the fine threaded rod (see picture
at right). If this floating connection can't provide zero tolerance and still
float, then this simple design will not "float your boat." In other words,
you need to go back to a conventional Mirror cell design, without bypassing
the Mirror holding cell, like I did. Do not go directly to the three floating
triangles, from the fixed platform (aka big
blue triangle), if this connection
isn't zero tolerance and still able to float 360 degrees.
As you can't see, there are no detailed pictures of that "magic" connection point. Accept that the "boat" floats, with zero tolerance, making this exclusive device work, and work well. Over the years, I've had [literally] hundreds of my exclusive designs pilfered by people who can only subsist by stealing the creativity from others - especially me. If you want to steal my creative "magic," buy a Tri-Cell. However, I would only hope that you are purchasing my Tri-Cell for the right reasons - because you want the best build-quality for a ridiculously low price. If you know anything about production and/or precision machining, you know this to be a very true quality vs price statement.
The question has been asked, "Why do I make my spiders and [now] Tri-Cells so "pretty?" After all, they are inside your tube, where no one can see and appreciate them. Same reason you want to see what's under the hood of a hot car. We love our machines and mechanisms. We take pride in what we build/create/possess. Possessions are everything. After all, we are good capitalists and proud materialists too. So, what's under your telescope's hood? VSI stuff, or the other guy's [Meade-iocre] rough, unfinished, pot-metal sand castings, etc? Let the star parties reveal all!
That reminds me of a cartoon I saw a few years ago. This guy is looking down the tube of a giant telescope at a star party. The illustrator drew what looked like a 20-incher at least. The caption read, "Hey, that primary mirror is only 3 inches!" In the cartoon, the telescope's owner is standing there with a smug expression on his face, saying nothing. Many stimulating conversations and friendships are begun at star parties will VSI stuff in (and out of) your tube assembly. Of course, if you've been to a lot of national star parties, you know that already. Thanks for over 25 years of continued support! - PBVS
![[top of the page]](topage.jpg)
The four Spider/Tri-Cell/Focuser combinations below should provide a simple visual reference to help select the parts you need to build your custom Tube assembly. If you purchase any two of the three items on the same invoice, you can request 10% off the total price. If you purchase all three items (VSI Spider, Tri-Cell and Focuser) on the same invoice, you can ask for 15% off the total price. But you must ask for the discount when you place your order. This generous offer is not automatic and not refundable after your purchase. No other combined VSI discounts apply.
The combinations below are only recommendations for your reference, edification and enlightenment. They are not pre-packaged sets with fixed pricing. You have to create/assemble/build your own custom Tube package from the listed and pictured suggestions below. This selection process has always been fun for me. I hope that you will feel the same? If not, just get a cursory idea of what you want from the following, and give me a call. I am always happy to help in any way I can. - PBVS
 |
For Newtonian/Dobsonian Tube Assembly: Includes Manual push/pull/rotate Spider, Tri-Cell and VSI Focuser of your choice, appropriate Docking Converter (listed below): All you need to add is your Tube, and a primary and secondary Mirror. Go to SPIDERS link to select the appropriate spider assembly. Note that the diagonal Mirror holder needs to be purchased separately (call for pricing). Then go to the top of this TRI-CELLS page to select a corresponding primary Mirror cell. Next, go to FOCUSERS link to select the 2" or 3" TOAD of your choice. There are many VSI focusers to select from, so take your time looking. Also, if you want to install a 3" TOAD, you will need to select from a list of OUTPUT ADAPTERS, which is at the FOCUSERS link. 2" TOADS accept any standard 2" barrel-nose eyepiece or diagonal, so they don't require any additional output adapters. Then select the correct Docking Converter from the bottom of this page. If you purchase this package, there is no additional charge for mounting the docking converter to the Tri-Cell. But again, you must ask or I will charge accordingly. After selecting your components to the best of your ability, you will probably need help or just some confirmation that your selections are corrrect. So give VSI a call M-F, 9-5 mountain time. Some drilling, cutting and assembly is required. |
 |
For Cassegrain Tube Assembly: Includes Manual push-pull Spider, Tri-Cell and VSI Focuser of your choice, appropriate Docking Converter (listed below): All you need to add is your Tube, and a primary and secondary Mirror. Go to SPIDERS link to select the appropriate spider assembly. You may need a larger diameter secondary Mirror holder disk (optional). If your secondary Mirror is the same size as the diameter of the collimatable head, or slightly larger, simply glue your secondary Mirror directly to the adjustable head. Then go to the top of this TRI-CELLS page to select a corresponding primary Mirror cell. Next, go to FOCUSERS link to select the 2" or 3" TOAD of your choice. There are many VSI focusers to select from, so take your time looking. Also, if you want to install a 3" TOAD, you will need to select from a list of OUTPUT ADAPTERS, which is at the FOCUSERS link. 2" TOADS accept any standard 2" barrel-nose eyepiece or diagonal, so they don't require any additional output adapters. Then select the correct Docking Converter from the bottom of this page. If you purchase this package, there is no additional charge for mounting the docking converter to the Tri-Cell. But again, you must ask or I will charge accordingly. After selecting your components to the best of your ability, you will probably need help or just some confirmation that your selections are corrrect. So give VSI a call M-F, 9-5 mountain time. Some drilling, cutting and assembly is required. |
 |
For Cassegrain Tube Assembly: Includes Motorized Spider, Tri-Cell and VSI Focuser of your choice, appropriate Docking Converter (listed below): All you need to add is your Tube, and a primary and secondary Mirror. Go to SPIDERS link to select the appropriate motorized spider assembly. You may need a larger diameter secondary Mirror holder disk (optional). If your secondary Mirror is the same size as the diameter of the collimatable head, or slightly larger, simply glue your secondary Mirror directly to the adjustable head. Then go to the top of this TRI-CELLS page to select a corresponding primary Mirror cell. Next, go to FOCUSERS link to select the 2" or 3" TOAD of your choice. There are many VSI focusers to select from, so take your time looking. Also, if you want to install a 3" TOAD, you will need to select from a list of OUTPUT ADAPTERS, which is at the FOCUSERS link. 2" TOADS accept any standard 2" barrel-nose eyepiece or diagonal, so they don't require any additional output adapters. Then select the correct Docking Converter from the bottom of this page. If you purchase this package, there is no additional charge for mounting the docking converter to the Tri-Cell. But again, you must ask or I will charge accordingly. After selecting your components to the best of your ability, you will probably need help or just some confirmation that your selections are corrrect. So give VSI a call M-F, 9-5 mountain time. Some drilling, cutting and assembly is required. |
 |
For Cassegrain Tube Assembly with Motorized Spider, Tri-Cell, No VSI Focuser, appropriate Docking Converter only (listed below): All you need to add is your Tube, and a primary and secondary Mirror. Go to SPIDERS link to select the appropriate spider assembly. You may need a larger diameter secondary Mirror holder disk (optional). If your secondary Mirror is the same size as the diameter of the collimatable head, or slightly larger, simply glue your secondary Mirror directly to the adjustable head. Then go to the top of this TRI-CELLS page to select a corresponding primary Mirror cell. Then select the correct Docking Converter from the bottom of this page. If you purchase this package, there is no additional charge for mounting the docking converter to the Tri-Cell. But again, you must ask or I will charge accordingly. If you have a non-VSI focuser you want docked to a VSI Tri-Cell, VSI can machine a custom docking converter to your specifications. Just tell VSI your output thread or config, etc. After selecting your components to the best of your ability, you will probably need help or just some confirmation that your selections are corrrect. So give VSI a call M-F, 9-5 mountain time. Some drilling, cutting and assembly is required. |
 |
4"
Square Base Plate to
3.25"-16tpi Male Threaded Docking Plate Converter: This docking converter
will allow mounting a 2" TOADLOADER to your Newtonian
or Dobsonian telescope. Includes mounting hardware, and is designed for easy
installation on all Newts and Dobs. The mounting plate has a flat base so
you can fabricate a curved, flush mounting from soft materials (i.e. wood,
plastic, foam, etc.) to easily form/flush mount the ANT43 onto your scope.
Or, if your scope has a flat mounting plate, all you need to do is align
the four holes and mount the plate. Then simply screw your 2" TOADLOADER
(model of your choice) to your existing Newt or Dob scope. Mounting hardware
included.
NOTE: Since 2" TOADLOADERS have 1" of travel, you may want to purchase VSI's 6" Extension DrawTube (item DT-6, go to FOCUSERS link, then click on ACCESSORIES link) to increase your range of focus to 4 or 5 inches. This may require you to move your primary Mirror forward to increase back focus distance.
|
 |
4.5"
Round Flat-Bottom Base
to 3.25"-16tpi Male Threaded Docking Converter: This docking converter
will allow mounting a 2" TOADLOADER to your Cassegrain
or custom telescope with a flat visual back. Includes mounting hardware and
is designed for easy installation on all scopes that will accommodate this
type of converter. Fully machined from a massive 1-inch thick cylinder of
extruded 6061 aluminum. Mounting base angle is adjustable using push-pull
set screws and Allen bolts. After you custom mount this converter, just screw
your TOADLOADER (model of your choice) onto your scope. The 3 recessed [Allen
bolt] holes are opposed by 120 degrees. Mounting hardware included.
NOTE: Since TOADLOADERS have 1" of travel, you may want to purchase VSI's 6" Extension Drawtube (item DT6, go to FOCUSERS link, then click on ACCESSORIES link) to increase your range of focus to 4 or 5 inches.
|
 |
6"
Square to VSI's proprietary
3.8" Flanges Docking Converter: This docking converter will allow
mounting a 3" TOADLOADER to your Newtonian or Dobsonian
telescope. NOTE: Since TOADLOADERS are only offered in 1-inch travel (OMEGATOAD)
and 5-inch travel (ALPHATOAD), you may need to have VSI machine a custom
moving Tube that provides around 3 inches of travel range (additional cost
applies). VSI only offers this converter with a flat bottom, so you will
need to adapt your scope accordingly. Take this mounting plate, and your
docking converter to use as a template, to a local machine shop. Have them
match a 6" square plate (machine a radius block or two radius bars) with
a curvature to match the outside diameter of your scope's Tube assembly,
or you can hand form a matching radius block/bars using soft materials such
as wood, plastic or foam using a bandsaw, belt sander or grinding wheel,
etc. Mounting hardware included. You might find it fun and it does create
a wonderful gloat trip. I made this!
|
 |
6" Round
Flat Bottom Base to VSI's proprietary 3.8" Flanges
Docking Converter: This docking converter will allow mounting a
3" TOADLOADER to any Cassegrain orcustom scope
with a flat visual back. It can easily be mounted to a Tri-Cell. There are
3 recessed mounting holes opposed by 120 degrees with 1/4-20 set screws inserted
next to each hole (see picture) so you can fine-adjust (push-pull) the mechanical
alignment of the focuser relative to it's optical axis. Mounting hardware
included.
|
![[return to home]](bareturn.jpg)