
VSI Imaging Products at Work, Helping to Image the Real Universe
SLIDER 2 SKY & TELESCOPE Test Report (July 2002)
"Try not. Do. Or do not. There is no try." - Yoda
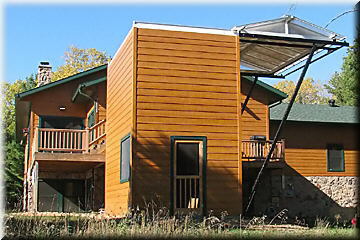
Tyler Allred's Nocturne Observatory
Located in Tremonton, Utah
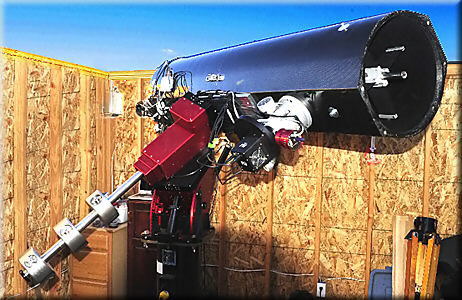
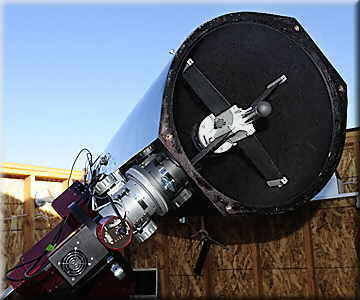
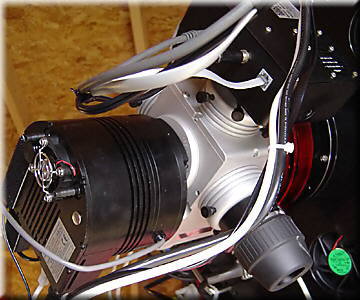
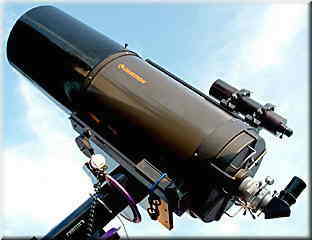
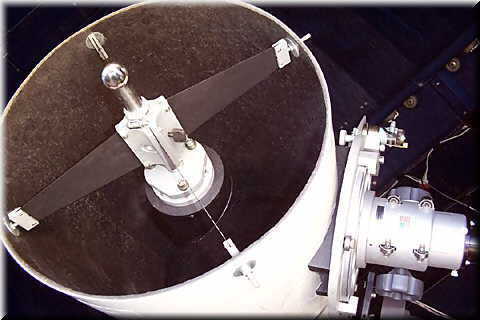
The scope (above left) is based around a Carl Zambuto 12.5" primary mirror and an Antares 4" secondary. The tube is a 390mm I.D. carbon fiber sandwich design from Klaus Helmerichs in Germany. The mirror cell, spider, and Toadloader focuser were custom machined by Paul Van Slyke (Van Slyke Instruments): they are bomb proof.
The spider (above right) is an SH3 from Paul Van Slyke and is a work of art. The center shaft is 1" stainless steel, and the adjustments are made with 3 spring-loaded allen bolts... that means no push/pull adjustments, which makes it super easy to adjust.
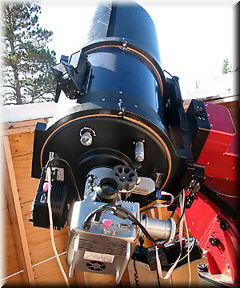
The mirror cell (below left) is a Tri-cell from Paul Van Slyke. It features 3" collimation knobs that require no push/pull adjustments. It is a breeze to collimate... just turn the knobs. This thing is built to last, with 3/4" stainless steel rods for attachment to the tube. No flexure here! I lined the tube with Protostar flocked plastic liner material, which really seemed to help the contrast. You can see where the liner begins in this image... it is almost perfectly black and really limits reflections off the tube walls.
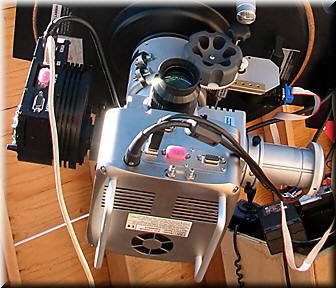
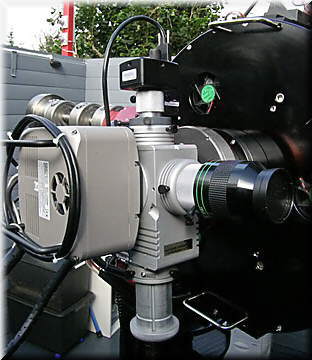
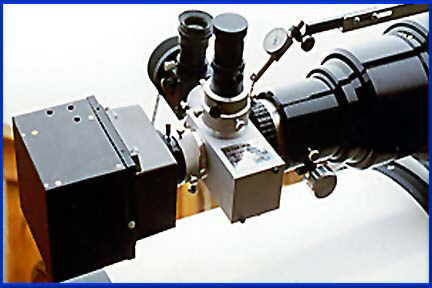
Here is the massive 3" focuser... a Van Slyke Toadloader with autofocus (below right). I sent the 3" Wynne corrector to Paul Van Slyke and he machined the drawtube to fit like a glove. There are six set screws to hold the Wynne in the tube, but it fits so well I could probably use just one and be fine, even with the weight of the camera, filter wheel, and guider assembly. For scale, the knobs are 3" diameter. This thing is bomb proof... no flexure issues with this focuser
Tyler Allred, Utah
And, I gave him a 15% discount for purchasing all three VSI products at the same time. That saved Tyler many hundreds of dollars off the bottom line. - PBVS


The Backyard Newt Telescope built by Richard Muller
Located in Lohmar, Germany

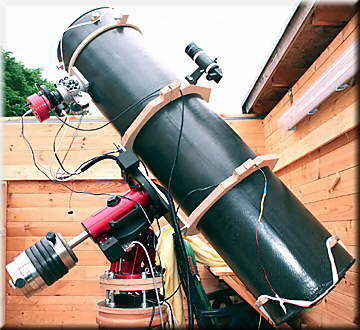
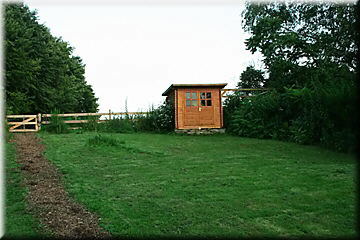
The tube and mirror cell are made from carbon fiber. The primary mirror is a 12.5" f/4.5 conical face mirror from Robert Royce. The secondary mirror is from United Lens with a minor axis of 89 mm. The complete scope is made for imaging only. The scope is mounted on a Gemini 41 mount from Andras Dan in Hungary. I use a monochrome CCD Artemis 4021, 2047 x 2047 pixels and an Atik filter wheel with filters from Baader (L,R,G,B, HA). My observatory (pictured below right) is about 20 km from Cologne and Bonn on the eastern side. We live in a small hamlet with 3 old houses. The hamlet is called Hoefferhof and belongs to the small city of Lohmar with a population of around 30,000 people. Mounting my own stepper motor to the VSI 3" TOAD was very easy. The base plate for the VSI Toad was custom made for my Newtonian by Steffen (www.greatstar.de).
Richard Muller, Germany
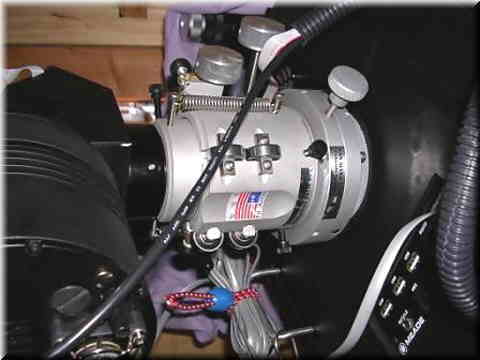
Note the custom stepper motor that Richard installed himself (upper
left picture). If you don't want a Lunatic Astronomical, Robo-Focus stepper
motor or VSI's DC servo motor (and hand paddle), you can easily mount your
own motor to any TOAD using its existing oversize motor mounting plate. Richard
ordered his TOAD without the motor (saves you $100). Looks like he drilled
three holes in the Toad's motor plate and slipped the (included) spur gear
over his motor's shaft - motor install complete. Since the stainless steel
(SS) motor arm itself slides in and out with the simple turning of a thumb
screw (instant engage/disengage), and the motor plate is slot adjustable
on the SS arm, you have a very versatile focuser motor mounting system that
can accept any focus control motor using simple and easy ATM mounting methods.
- PBVS

Richard also had the Newt base plate custom machined locally to match the exact curvature of his tube assembly. VSI doesn't have the in-house capability to cut large diameter curves to match everyone's unique tube diameter. VSI only offers flat bottom square base plate converters for Newts. That requires you to fabricate a custom radius block to match your tube's diameter (see FOCUSERS link, DOCKING CONVERTERS/ADAPTERS). Richard decided to go directly from his tube to VSI's 3.8" circular flange insert - no 2-part conversion. - PBVS

Frank Hol's Celestron 14" Scope set-up in the Field
Located in The Netherlands
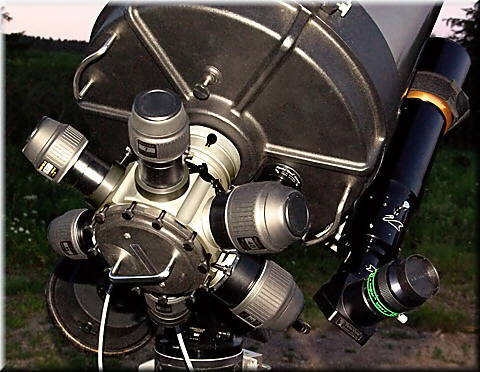

Dear Paul,
A few months ago, I received your VSI 3.25” – 2” (6x) HEX2 Turret, to be used on my Celestron CGE1400. I’ve loaded the Turret with my Pentax XWs (set of 6, 7mm – 40mm) and so far I’ve used it several times under dark skies. Using your Turret is a delight: I now switch eyepieces for every object I’m observing, without any compromise – and this is a big difference compared to my pre-turret past. The ‘observing experience’ got an additional dimension: I checked several magnifications in order to find the best for the object – and that’s totally new to me. I can’t do without [the HEX2] anymore! What to do with my diagonal??
The filter slide is a delight as well: very quick and easy – good for comparison. This is also new to me.
I’m impressed by the fit and finish of all components. It’s true: it’s visible that the turret is a hand-made masterpiece, but this provides an additional dimension as well.
Shipping of the unit from the USA to the Netherlands was no problem as well: it arrived at my house 14 days after dispatch (after staying approx 1 week at Dutch customs) – very well packed without any damage at all.
Final conclusion: I should have bought this unit years ago.…
Txs a lot for your help and support, and your great product.
Frank Hol, The Netherlands

The Portable Telescope of Scott B. Schneeweis
Located in Pearl City, Hawaii


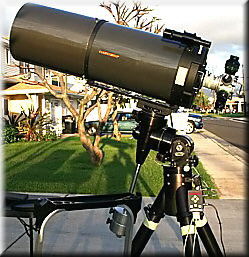
Scott's Celestron C-14 OTA is mounted on a Losmandy HGM Titan. VSI's Giant 2" Hexagonal 2Turret, with integrated 2" filter slot adapter, is loaded with 6 Televue Nagler eyepieces including a 31 Nagler (the hand-grenade!). He is using this as a portable assembly. While the total weight of the rig runs approx 240 pounds, everything breaks down into manageable components; the heaviest is the Optical Tube Assembly itself at 45 pounds. The Van Slyke turret, with eyepieces adds 12 pounds and approximately 9 inches of back focus (easily compensated for by the C-14 primary focuser). With the Astro-Zap rigid Dew Shield in place, and the OTA dovetail slid far forward in the saddle, tube counterweighting is not required to offset the addition of the turret.
Additional non-stock items include an after-market extended counterweight bar, AP illuminated 8x50 finder plus Televue Starbeam and Robin Cassady 23 pound stainless steel counterweights. The mount seems to handle the OTA well however future plans include migration to the Paramount ME to accomidate this OTA as well as a larger 18" Classical Cassegrain currently under development by Astrophotographer Richard Crisp.

The Backyard Visual Telescope of Robert Brown
Located in Arlington, Texas

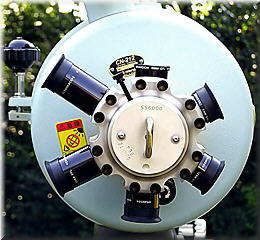
I have chosen my equipment very carefully in pursuit of the ideal backyard setup for mainly planetary and lunar observations (VISUAL). A brief description of the telescope, the mount, and the eyepieces used will hopefully illustrate some success. I use a Tak CN212 in the Cassegrain mode (the Newtonian mode I use at dark sky locations). The Cassegrain focal length of 2630mm provides a nice image scale. My mount is an alt/az Heavy Duty Binoscope mount with custom parts to insure stability. I also have heavy duty slow motion controls. The alt/az arrangement is in my opinion superior to an equatorial mount for visual application.
I have strong opinions about the value of turrets. They in NO way degrade the image. I have used most of the high end turrets - Tak, TEC, and Zeiss. They are all excellent, but the VSI HEX1 Turret is my current choice. The HEX 1 provides several functions that are absent in the others. The construction quality is also much better in my opinion.
For eyepieces I decided to use Brandons. There are now six [non-Questar] Brandons being manufactured. The 32mm, 24mm, 16mm, 12mm, 8mm, and 6mm. With focusing care (focus at high power first) these eyepieces are parfocal - not approximately, but dead on. I never have to change eyepieces or focus and simply click to easily change powers.
Robert Brown


No, Robert's custom fitted case does not come with your HEX. However, all HEX1s and HEX2s do include six red [eyepiece port insert] covers and a black 2" barrel-nose cover (HEX1 only, since the HEX2 has no 2" barrel-nose). To find a nice case like Roberts, simply type "molded cases" into an internet search engine and you will be overwhelmed with selections.
Better build-quality than Zeiss! And more functions and features too. Whoa! These "give-away" prices have got to stop. I need to consider raising my prices SOON! - PBVS

Dr. Edmund Georgii's Meade 12" ACF and a Spiral Staircase
Located in Landos, FRANCE
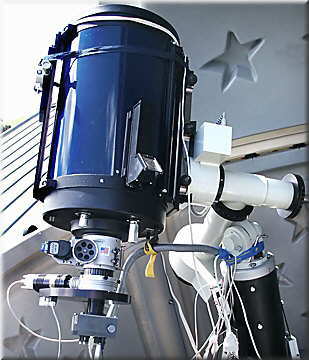
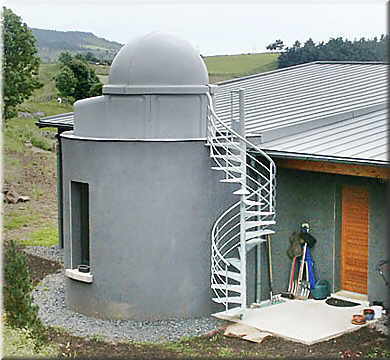
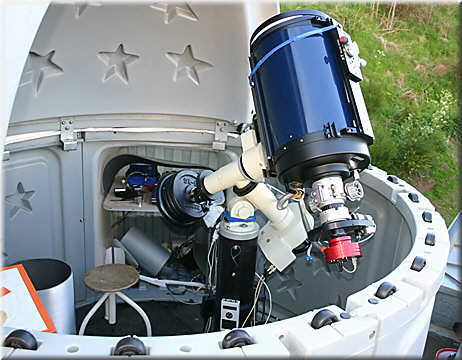
This user install has to be the cleanest and coolest ever! I love spiral staircases! And when it provides access to an observatory, I get all teary-eyed, etc. Did I say very cool install? I will assume that the dome is a fiberglass prefabricated install, which seems to have an inner lining full of 5-pointed stars." Since the stars are recessed, I will also assume that they are inner panels that finish the inside of this pure "class-act in and out" observatory. As you can see from many of the other user installs below, most observatory owners do not take the time and/or effort to finish the inside of their observatory. They are unfinished two by fours and unpainted plywood, etc. I consider this to be "tacky" looking at best. Just a little paint please.
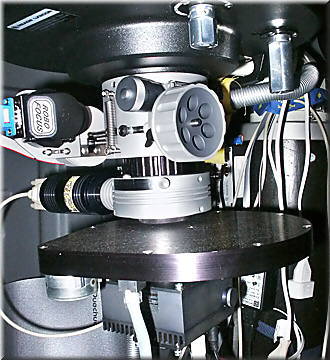
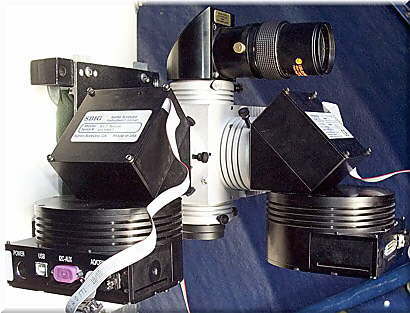
Dr. Ed provided a detailed rundown on the "workings" of his observatory. And "it's full of stars." The mount is a solid ALT-5 ADN GEM with dual-axis motorized control and a periodic error of about 2 arc seconds peak to peak. The GEM is controlled by a Pulsar Controller made by Andreas Dan who also built the Gemini Mount. Dr. Ed has two scopes for this mount, a Takahashi Epsilon 180E and a 12" Meade ACF. Hidden inside the latter is an Astro-Physics focal reducer between (actually inside) theVSI 3" TOADLOADER and the VSI Targetron Off-Axis Guider (look close at the picture below right) attached to the visual back of his 12" Meade ACF* optical tube assembly. The unusual part of this install is the easy, off-the-shelf use of VSI stock port rings - no custom machining required!
* FYI, ACF (Advanced Coma Free) is Meade's new acronym for a combo (hyperbolic) Ritchey-Chretien/Schmidt Cassegrain (corrector plate) optical configuration. Interesting trade-off! However, I still prefer [the more expensive] RCs. Nagler "grenades" beware, less glass always means better seeing/imaging, no matter where the glass resides in your optical path. Less is always better, unless you're a pack rat. Hah!
Dr. Ed's imaging train build, from his scope to his CCD camera, follows:
-
The A381 below screws onto his Meade ACF large-format 3.25"-16tpi threaded visual back.
-
Docking Converter, Meade 3.25"-16tpi, female, Item A381
-
3" Secondary OMEGATOAD, [temp comp] stepper motor, Item OMG3
-
Threaded Output Ring Adapter for AstroPhysics, 2.7"-24tpi, Item A3124
-
Then his AP focal reducer screws into the A3124 above and the SR2724 below screws into his reducer.
-
Docking Port Ring, 2.7"-24tpi A-P refractor, male, Item SR2724
-
Targetron Off-Axis Guider, Item TARG
-
The cylinder protruding from the TARG is a Sigma 3200 guiding CCD camera
-
Camera Port Ring, 2"-24tpi standard SCT, male, Item CR224
-
His FLI filter wheel and Artemis 11002 CCD camera screws on to the CR224 above.
To simplify and clarify, the following + stack + info is also provided:
Meade 12" ACF + A381 + OMG3 + A3124 + AP focal reducer + SR2724 + Targetron + CR224 + FLI filter wheel + Artemis CCD camera
The above is Dr. Ed's imaging stack, but remember that you could also substitute the above 3" Targetron (Item TARG) for a 3" Zerotator (Item ZBR1) and/or 3" Sidewinder Optical Manifold (Item MPSW), creating my ultimate "Super Stack" stacked + + directly below (for more Super Stack stuff, scroll down the page to The Un-Vatican Observatory). Remember, all VSI proprietary 2.9" port rings are directly interchangeable between the Targetron, Zerotator and Sidewinder.
Meade 12" ACF + A381 + OMG3 + A3124 + AP focal reducer + SR2724 + Zerotator + SR29 + Sidewinder + CR224 + FLI filter wheel + Artemis CCD camera
Dr. Ed's install is unique because [usually] I have to do some custom machining to install someone elses focal reducer/coma corrector, etc. into one of my TOADS (see my CUSTOM MACHINING link, scroll down the page). Not this time. The entire imaging train, including the internal AP focal reducer, was assembled from stock VSI off-the-shelf docking, camera, reverse and coupling port rings, plus docking and output converters.
I've been working very hard, over the past few years, to try and offer stock adapters, port rings, converters, etc. for as many different scopes and cameras on the market [today] as possible. Of course, if you don't find an off-the-shelf stock port ring for your specific application, custom machined port rings are always available as a courtesy. I have created many custom [machined] focal reducer/coma corrector stacks over the years (again, see my CUSTOM MACHINING link and scroll down the page), but this is actually the very first off-the-shelf imaging train stack that incorporates an internal focal reducer, built entirely from stock VSI items. No custom machining also means that it saves you money, because my custom machining service is based on $100 per hour machine shop time. Hopefully this single "Doctor" installation provides some stimulating insight and creative stack ideas - mull it over in your pool. Remember, at VSI, anything is possible. Dream large! - PBVS

Bruce Anderson's 12" SCT and Astro-Physics 1200 Mount
Located in Maricopa, Arizona


Paul,
The serious amateur astronomer, institution, or observatory, should seriously consider the instruments developed and engineered by Paul Van Slyke at VSI to be nothing less than world class. Working with Paul to develop my imaging train was an enjoyable experience. If serious astroimaging is on your list, then you need a rock solid platform - VSI is the answer.
VSI focusers provide the ability to support heavy loads, with absolute zero flexure, particularly when I use SLR film cameras, and a very heavy and large medium format camera. In my opinion, upgrading to a 2" Toadloader provided me with a focuser that is smooth as silk, incredibly solid and built to observatory class standards. And it has a MicroDial that is ultra sensitive and micrometer accurate. I was so impressed with the workmanship and attention to detail, that I drove 12 hours, from Arizona to Colorado, to meet Paul and discuss the design and fabrication of a visual back adapter tube and focuser assembly for my piggy-backed 110mm William Optics refractor.
Needless to say, Paul was able to custom machine and install a 4" moving tube in my existing 2" Toadloader, and an extended visual back assembly which he created to exacting standards.
As an astronomer and builder of an observatory himself (Black Forest Observatory), Paul has that special ability, along with an "anything is possible" attitude, and the knowledge to fabricate only the finest astronomical instruments. All are handmade to your particular design needs. My goal for Province West Observatory, along with astroimaging, is to contribute observations and update existing lists in the measurement and study of binary stars. Using data from the US Naval Observatory double star program, target lists will be compiled on binary stars that need to have new measurements. I will soon be ordering the NEEDLEYE Bifilar Micrometer from VSI to assist me in making this project/program become a reality.
Thank you Paul, and VSI for designing and developing these world class instruments!
------------------------
A list of my equipment, pictured above and below, follows:
MAIN SCOPE (pictured above) - 12" Meade Schmidt-Cassegrain, VSI Zerotator, VSI 2" M4 MasterGlide Focuser, VSI Slider 2 Optical Manifold, Losmandy dovetail plate offset, Losmandy counterweights, Stellarvue 2" illuminated reticle eyepiece with Rigel Pulse Guide Illuminator, Televue 11mm Nagler eyepiece.
PIGGY BACKED SCOPE (pictured below) - William Optics FLT110 APO Refractor, VSI custom built tube adapter, VSI 2" Toadloader with moving tube upgrade (4" travel), Robo-Focus stepper motor, vintage flip-mirror diagonal from Black Forest Observatory, Televue 17mm Nagler eyepiece.
FINDER SCOPE - Borg 50mm Astrograph, with X-Y offset positioner and helical focuser, Televue 8-24mm zoom eyepiece.
MOUNT - Astro-Physics AP1200 mount with extended counterbalance, Astro-Physics 48" Pier.
Regards,
Bruce Anderson, Province West Observatory, Maricopa, AZ
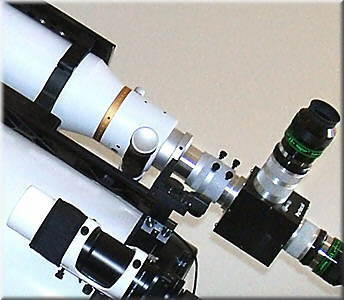
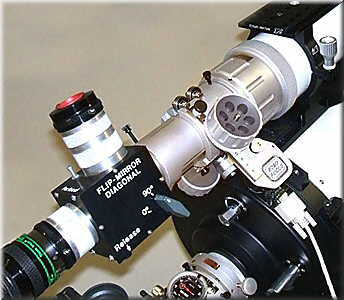
To better understand the visual back replacement/upgrade pictures directly above, see my CUSTOM MACHINING link, Bruce Anderson's [William Optics] Refractor Retrofit. FYI, the picture [above left] is BEFORE, and the [above right] picture is AFTER the upgrade. - PBVS

Guy Fleming's Dual Ritcheys
Located in Newcastle, NSW, Australia
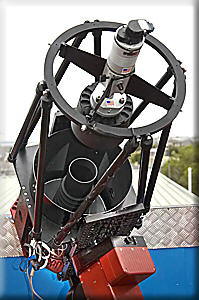

Shown above and directly below are two VSI (SH3) motorized secondary spider assemblies installed in Guy Fleming's two custom-built [carbon fibre truss] OTAs that he constructed. The optics are 12.5" Ritchey Chretien. He finished both tube assemblies recently and sent me some pictures. Whoa! You can compare Guy's [superior] custom carbon fibre OTA, with the VSI motorized spider upgrade, to Emmanuel Schalit's [stock] 16" RCOS featured below. The extra "beefyness" of the OTA's "rear end" with those super-rigid carbon fibre truss tubes up front, and the VSI spider assembly, are quite obvious to the most casual observer. You have to consider the smaller size and heavier construction of Guy's scope compared to Emmanuel's larger scope and lesser construction. Although I am sure that Emmanuel's RCOS production scope is very adequate for the job. After a lifetime of scope construction, I know that there is no such thing as "overbuilt" in terms that apply to any phase of telescope construction. It is simply adequate for the job, no matter how massive the construction.
You can also compare this VSI motorized spider assembly [for a Cassegrain] to a VSI manual spider installed on Steve Bell's Super Astroimaging Newtonian shown below. VSI spiders can be ordered in any size or config you want - motorized (DC servo w/paddle or computer autofocus) or manual (push-push back focus adjust) Cassegrain, or manual Newtonian (see SPIDERS link for details). Guy's super scope pictured above is [also] on a German equatorial Paramount under a roll-off roof observatory. Guy said that his designs are "simple with good fit and finish." I think Guy is like me? When he says simple, he doesn't mean "simple" in the true sense of the word. He means it like I do, when I say that my products are designed with functional simplicity at the heart of the construction process.
Note that the end of the helical spider's "hub can" is sporting a computer controlled Robo-Focus stepper motor from Technical Innovations (TI). I just buy the Hurst gear-reduced stepper motors from TI, with the DB9 plug already installed and wired, and mount them on my focusers and spiders. That way, I am sure that they are correctly incorporated into my products and operating properly. FYI, you purchase the electronics hardware package to operate their motor directly from TI. Then you just "plug and play." Great Fun!
Guy also sent me the picture below right. He explains his reason for the two tube assemblies, and more. - PBVS.
Hi Paul,
 The two OTAs made sense,
as I teamed up with an old friend of mine, Zane Hammond, to share costs.
I did all of the design, building & running around. He paid a larger
portion of the costs to cover my efforts. One of them is on my Paramount
up here in Newcastle, as in the pics you have (above). The other will be
getting installed at Zane's 'Magellan Observatory' under dark skies at the
end of the month, about 5 hours drive south. His RC will ride on a Losmandy
GM200 for now.
The other big reason for doing these paired RCs was the very limited availability of 12.5" f/6.7 Pyrex based RC mirror sets from Star Instruments at a reasonable cost. We both coveted RC capabilities but not their high cost, so we decided to get a set of these mirrors each. They ran out shortly after.
Then the long process of designing and building began. As you would know, there are not many 'how to' guides out there. As far as the construction, early on I thought I had easy access to a very large CNC based commercial workshop. I wasted a lot of time hoping to get some downtime on the machines. It soon became obvious that my machinist friend would not have the time, even with me doing the CAD. He was flat out with heaps of work. So I regrouped and reassessed the design. Sourcing 6061 plate in Australia is very difficult. I ended up having the basic Al-plate parts for the rear cage CNC routered, mainly to make sure the basic parts were square and concentric. I then bought a small mill drill and started the long process of milling. As you would realise, these two RCs are loosely based on the RCOS truss design concept of having a stiff plate rear cage with integrated dovetails, a fixed camera connection and a secondary focuser. But the rest is quite different in the details.
I have had part time exposure to a couple of very experienced old school machinists over the years with various ATM projects, so I knew the basics. As it turned out, it was better to build in a less automated way, since these are 'prototypes.' I was able to refine the design as I went, and I have had surprisingly few mistakes. I could CNC the lot quite confidently because now I had the ability. I should also acknowledge the help of Precise Parts USA - they helped with several difficult part designs, mostly with the fine threaded barrel which holds the field flattener lenses and the primary baffle assembly. I reckon I could have made these, but I would've had to make a few attempts and would not have saved money. The hardest thing with the parts was in the design. Simple 1:1 CAD diagrams helped a lot. And using off-the-shelf parts such as your SH3 made sense as well. I'm very sure that I couldn't build similar for less.
Anyway, this sort of thing would not be new to you.
Thanks again. Guy

The Un-Vatican Observatory
Located in Downsville, Louisiana


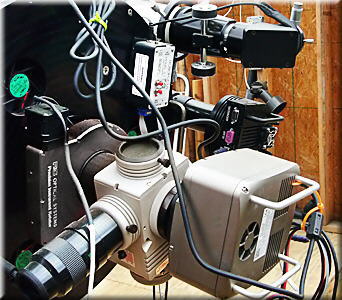
The Un-Vatican Observatory has two main telescopes. My Astro-Physics 130mm f/8 refractor under a 10’ Home Dome (above pictures), and my friend Charlie Brown’s 16” RCOS located in a roll-off roof just south of my domed building (below picture).
The 16” RCOS telescope usually carries the ST1301 camera with an internal filter wheel. This hefty camera is no challenge for the MegaPort [3" Sidewinder Optical Manifold], which enables us to switch rapidly to visual observing. If we “get lost” this feature enables us to synchronize the telescope on a star with no hassle. Charlie likes to take pictures of nebulae and galaxies.
My 130mm refractor also sports a MegaPort which carries an ST-8E camera and 10-filter wheel. Since both scopes have the MegaPort, it is easy to switch the ST-8E from one to the other—we have power packs on both piers. I have a V-filter on the filter wheel, which enables me to do variable star estimates that can be used by the AAVSO. I enjoy watching U-Geminorum type variables. I also use the scope to hunt for supernovae. I have “found” several, but I was never the first. That’s okay; looking for supernovae gives me an excuse to look at galaxies.
I have some older pictures that show the Van Slyke Slider [2" optical manifold]. Also, the older pictures have the AP focuser, but now I have the Van Slyke [3" MacroGlide ALPHA] focuser.
Also note that Pat has a VSI 3" Zerotator between the ALPHA focuser and the Sidewinder creating what I call the Super Stack. - PBVS
I can't say enough to praise the sturdiness of the Van Slyke components. They are definitely “over-built” for the job that I have them doing. Thanks for great products!
Clear skies!
Pat Madden, Downsville, LA
I asked Pat if he could explain the significance behind the unique name of his [Un-Vatican] observatory. Here's what he said. - PBVS
"When I was a seminarian there was a place on campus where we could get pizza and beer. The "decor" made it look like a stable, and the establishment was called "The Un-Stable," a pun on what would happen if you got the wrong proportions of beer and pizza!
When I thought about the name for my observatory I picked "Un-Vatican" because 1) my setup is much more humble than the Vatican Observatory 2) I thought it was a suitable penance for the Catholic Church for the sins of our past against science to have an observatory named "Un-Vatican," now that Galileo has been recently, in belatedly, un-condemned by our last pope, John Paul II, may he rest in peace." - Pat

The 16" RC Telescope of Keith Quattrocchi, MD, PhD
Located in Lewiston, Maine
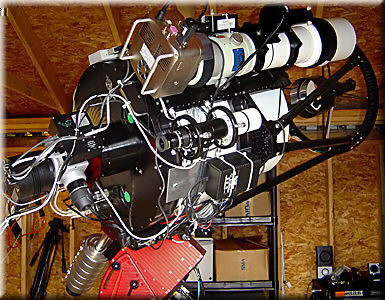
A very impressive 16" f/9 Ritchey-Chretien scope by RC Optical Systems on a Bisque Paramount ME equatorial mount. The scope has a 45 arc-second pointing accuracy (yah, I said arc-second) using Bisque's T-Point model software and a 350-point error correction grid. The imaging train consists of an RCOS field flattener and VSI Mega-Port Sidewinder optical manifold with an SBIG ST10-XME CCD camera at the output of the Sidewinder. The scope also has a Takahashi 106 FSQ refractor with SBIG STL11000 piggy-backed on the RC scope. Keith guides with an internal SBIG 237 CCD or an off-axis guider (402 XME). See his Sidewinder comments at our COMMENTS link.You can find more info on this spectacular installation at Keith's web site at www.maineastro.org.

The Backyard Observatory of Dale Mais
Located in Southern California

Dale's installation is anything but typical, and he's doing real science, too. In conjunction with the University of Denver and Dr. Robert Stencel (known as Dr. Bob by the locals), he's monitoring Mira-type long-period variable stars trying to catch any short-lived flare activity. The scope is a 14" Celestron SCT with a piggy-backed 5-inch f/6 Astro-Physics refractor. These two scopes are then mounted on a German equatorial Paramount by Software Bisque. The imaging train (inset above) uses a VP Slider optical manifold to instantly switch between a Santa Barbara Instruments Group ST-8E CCD camera and filter wheel, to a SBIG spectrograph connected to another ST-8E CCD camera. In addition, there is a spectral calibration lamp, various motorized focusers and a mass of wires dangling from the scope's imaging train. All this is supported by one Slider. Whoa! Could any other similar commercial device even come close to supporting this extreme [over] load? I'll leave this question rhetorical, because you know the answer. You can read more about Dale's equipment and research by referencing the article in Sky & Telescope magazine (May 2003 issue, page 51) or visit his web site.

Bob Shartrand's Mountain Top Observatory
Located in Livingston, Tennessee

Bob chose the Van Slyke [discontinued MasterGlide M1] focuser (now 2" TOADLOADER) because of its workmanship, value and sheer beauty. Bob said he does a lot of astrophotography and the precision of the M1 focuser makes focusing much easier. This proves that you don't need all that fancy autofocus stuff to do good astroimaging. A simple, basic M1 manual focuser will do just fine because all VSI focusers have zero flexure under any load. The OTA is a C14 Fastar mounted on a Parallax HD150 mount that is equipped with digital setting circles. Bob's been an amateur astronomer since he was 13 years old and built his first 2" refractor.

A Permanent Home Observatory with Full Robotic Control
Located in Nevis, Minnesota
This observatory installation belongs to Rick Johnson. His 12" Meade LX200R is on a Paramount with pointing and imaging robotic control from inside his house via a notebook computer. Rick's imaging train holds a VSI 3" MacroGlide OMEGA focuser installed directly to a VSI Sidewinder optical manifold. His imaging camera is an SBIG STL11000, with an SBIG ST10 as a guiding camera. And the STL CCD camera's silver finish matches VSI's glass beaded finish perfectly. Note the 2" Televue eyepiece used for visual observing and/or target acquisition.
 Installing a VSI optical manifold
has many advantages besides instantly observing [through an eyepiece] what
your imaging camera sees, and guiding using its built-in off-axis guider
capabilities. You can also visually observe the night sky using the optical
manifold as a simple diagonal, without having to disassemble your entire
imaging train and rebalance your scope. And when you want to manually [knob]
focus using an eyepiece, a simple turn of a knob disengages the Hurst stepper
motor from the MacroGlide focuser's gear train.
He uses a mirror on the back of the scope as a safety interlock. When the scope is parked, an infrared eye hits the mirror and returns to the receiver. The roof won't roll unless the circuit is complete. Most of the time, Rick runs his scope entirely from the house and can't even see his observatory.
The scope is 16' above ground level. There's a reinforced concrete pier separate from the observatory structure that carries the scope. It extends into a large base 4 feet underground (see picture at right).
Since the changeover to a VSI imaging train, Rick says his corner imaging resolution has improved considerably. Flex in the Meade "Micro Focuser" was killing one corner of his images because the focuser couldn't hold the STL series camera parallel to the image plane. All VSI products are guaranteed zero flexure under any load, period!

Emmanuel Schalit's 16" RCOS on a Paramount
Located in Paris,France

Emmanuel calls this installation an amateur endeavor. Looks professional to me. The hi-end components include a Paramount German equatorial mount, a 16" RCOS Ritchey scope, a VSI Sidewinder optical manifold and SBIG STL11000 CCD camera. Just for the record, Mr. Schalit noted that this is not him in the picture below. It is his friend, Thierry. However, Mr. Schalit did have this to day about the Sidewinder. "The Van Slyke Sidewinder (signed by Paul) is an incredible device allowing you to do both off axis guiding (note the SBIG remote guide head in black, above left) and visual work without any change in your imaging train." You can see a slide show about the installation of this equipment and more at his web site.


A 36" f/4.8 Robotic Newtonian
Located at Kingsland Observatory, Ireland


The VSI custom built focuser (see MACHING link for more info on this focuser) has an Apogee AP8p CCD camera attached offering a field of view of 20 minutes x 20 minutes of arc. This scope has been upgraded to operate as a robotic telescope in preparation for a statistical sky survey in collaboration with the Planetary Space Science Research Institute in the UK. The VSI custom machined focuser was designed with a full 2" internal clear aperture drawtube built-in. Custom machined many years ago, this focuser is very similar to our giant MacroGlide focusers and was upgraded from its original DC servo motor to Robo-Focus control recently. The scope's builder, Eamonn Ansbro is on the hoist at the focusing station.

Steve Bell's Super Astroimaging Newtonian
Located in Elizabeth, Colorado

I don't know much about Steve's super Newtonian but he installed a 3" Sidewinder optical manifold a while back (above left), and recently completed the installation of a VSI CYCLOID Crayford Disk Rotator (above right). In the near future, he's going to install a VSI MacroGlide OMEGA 3" focuser to replace his existing AstroPhysics rack & pinion focuser. He said that the current AP R&P focuser shifts his image around the chip a bit when focusing, but tolerable for now. The only sure way to achieve zero flexure is to install a robust Crayford focuser, like VSI line of super focusers. He still hasn't sent me a story about his scope, but he is installing a new primary mirror, so after that, I suspect a story will be coming. Although the above left picture shows a Robo-Focus stepper motor installed to drive the rotator, that's been replaced with a DC servo motor because the stepper motor did not rotate the disk fast enough - patience is a virtue! Now he can easily switch between stepper and DC servo motor. He uses it exclusively to remote rotate his entire imaging train in the Z-axis to find adequate guide stars. If you're an astroimager, you know how difficult it can be to locate a useable guide star. Steve is very impressed with the rock-solid, zero-flexure operation of his [now discontinued] VSI CYCLOID rotator, too. BTW, I do have one, and only one, CYCLOID rotator available, if anyone is interested? Call me!
VSI's Sidewinder optical manifold can install on any scope, even Newts, as you can see. You can create some amazing configurations using its myriad of different output ports, and it even has a special pick-off mirror port with dual-axis mirror control (see ROTATORS, MACROGLIDE FOCUSERS and SIDEWINDER links for details).
Steve has recently installed a VSI 3" MacroGlide focuser on his CYCLOID and, even more recently, installed a rock-solid VSI Spider assembly (see picture below and VSI's SPIDERS link). You can also visit Steve's web site.

Jeff Bennett's Zerotator and MasterGlide Focuser Installation
Located in Ojai, California
Jeff docked a VSI 4.5" Zerotator directly to his Meade 12" RCX's 3.25" threaded visual back. Then he installed his VSI 2" MasterGlide focuser (now 2" TOADLOADER) onto the output of the manual Zerotator. VSI has dozens of port rings that will adapt our Zerotator, Sidewinder or Targetron (the former all use the same 2.9" proprietary port rings) to any configuration you can concieve. In this instance, Jeff used our SR325 3.25"-16tpi female docking port ring on the input side of the Zerotator and our RR325 3.25"-16tpi male reverse port ring on the output side duplicating the scope's visual back 3.25" threads on the output of the Zerotator. This combination allowed him to "sandwich" the Zerotator between his scope's visual back and his existing VSI focuser. Now he can rotate his entire imaging train, including the focuser, with a single touch. The more you load the Zerotator's radial ball bearings, the more stable your imaging train. The same principle applies when you load the tapered-race roller bearings on a German equatorial mount. See VSI's ROTATORS link for more info about our rotators.

The University of Denver's Meyer-Womble Observatory
Located atop Mt. Evans, Colorado at an altitude of 14,148 feet
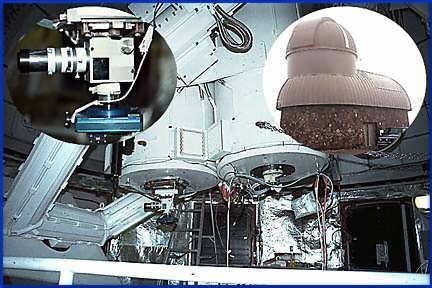
The Mt. Evans observatory packs a pair of 28.5" reflectors mounted in a unique double ended yoke. DU claims to have the "world's highest operating observatory." The above right inset is the observatory facility that houses the dual telescopes. The structure is designed to handle very high winds. The left inset is a close-up showing VSI's Versa-Port Flipper (now discontinued) inserted in the business end of the left tube assembly.

Clint Lincoln's New Tak that has EXTENDED BACK FOCUS!
Located in Frederick, Maryland
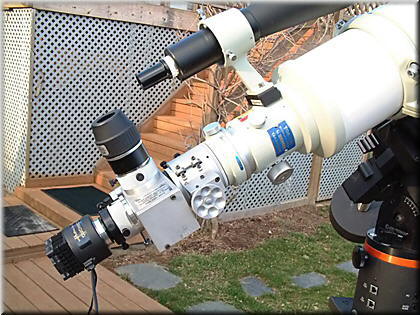
This is Clint Lincoln's NEW Takahashi TOA-130 Ortho-apochromatic scope (130mm lens at 1000mm focal length) that has plenty of back focus to accept a long, extended imaging train, like the one pictured above. Clint even has a VSI micro-fine secondary focuser (MGF1) piggybacked in the imaging train and the scope's [coarse] primary focuser has "in-focus" room to spare. It was designed to offer the imager more than adequate back focus as well as being highly corrected for chromatic aberration. From the sky side, the aftermarket imaging train includes, a [now discontinued] VSI MicroGlide MGF1 focuser, a [1998 vintage] Versa-Port Slider optical manifold, and a CCD camera. From the Tak's 2.7-inch primary focuser, there is about 10 inches of back focus allowing a CCD camera to be in focus with plenty of other stuff in between. In the pic, the CCD camera is in focus and the primary [Tak] focuser is still racked-out about an inch. Whoa! The Tak tube assembly is mounted on a Celestron CGE w/Nexstar GOTO, and that mount is installed on a STEEL PIER in Clint's backyard.
Finally, a Tak with plenty of back focus! In Japan, guiding is primarily done with attached guide scopes. They do [did] no off-axis guiding so their scope's have [literally] no back focus range. Previously, with the focuser racked all the way in, you barely had enough back focus for a diagonal and eyepiece, let alone an extended imaging train of any kind. This has been their way for decades. No one really knows why. Maybe they think their guide scopes look so cool that they can't part with them? The facts are that guide scopes cause flexure and less than perfect images over long guided exposures - gravity works! You can easily eliminate all flexure and image guiding problems by using an off-axis guider (like VSI's Slider), that guides on exactly what your camera sees, so flexure and other guiding problems are taken out of the equation.

Tom Porter's Televue NP-101 w/piggybacked Epsilon Autofocuser
Located in Peyton, Colorado
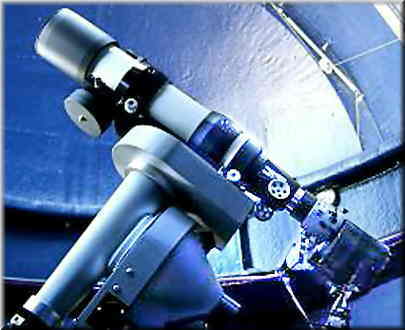
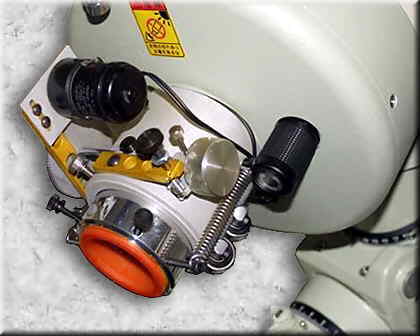
The Televue NP-101 is mounted on a rock-solid MI-250 from Larry at Mountain Instruments (see our ASTROLINKS link for MI's web site) with the "goto" being provided by Gemini. A [now discontinued] VSI MicroGlide Epsilon focuser (MGF1) is docked to the output of the Televue's focuser using our standard MR224 Docking Adapter coupled to our A2LT 2"-24tpi Threaded Barrel-Nose Adapter (see SLIDERS link, ADAPTERS link). If you wanted more back focus for a longer imaging train installation, you could remove (unscrew) the stock Televue R&P focuser and dock the Epsilon or Omicron model directly to your Televue's 3"-24tpi threaded visual back using another of our standard MR324 docking adapters. The CCD camera at the output of the Epsilon is a SBIG ST10 docked to the Epsilon with our AZP2T Zero-Profile T-Adapter (see SLIDERS link, ADAPTERS link). Anything is possible with the myriad of VSI adapters, converters and port rings that are "off-the-shelf" available. And if we don't stock it, we'll machine a custom adapter for your special installation. Is this super mount overkill? Probably, but such stable accuracy is envied by many. Periodic error is less than 2 arc-seconds (that's seconds, with an S) and the firmware (version 3) has simplified achieving good polar alignment.
You can find more info about Tom's installation at his web site.

Steve Linscott's VSI Bifilar Optical Micrometer with Remote Video Output
Located in Baytown, Texas

Steve's astrometric configuration includes a Celestron C8 on a Losmandy German equatorial mount and a Van Slyke Digital Bifilar Micrometer. The BFM's reticle lines are 10 microns, the digital readout has a resolution of 0.0005", and the 4" diameter position angle indicator has a 0.1 degree vernier scale. Steve machined a sleeve for his video camera so he could switch between the BFM's eyepiece and his video camera (shown installed in the picture above). He views the images on a small monitor, which permits comfortable remote observing in any position, and also eliminates possible parallax problems caused by eye placement at the eyepiece. You can find more info about Steve's installation at his web site.

John Maher's Takahashi Mewlon 210 Installation
An old Monster 3 focuser [now 2" TOADLOADER] docked to a Takahashi Mewlon 210. John had a custom ring machined locally to dock the VSI focuser to his Tak, but VSI can also custom machine docking rings for any scope, if we don't already have one in our extensive docking ring inventory. John also said that, "Your focuser is by far light years ahead of anything else I have ever used and a perfect match for the Tak product." Understand, this is the old [now discontinued} Monster focuser. It's replacement, the MasterGlide focuser, is also light-years beyond the old Monster focusers.

Mark Starr's C5 and VSI Imaging Train
Located in Tampa, FL
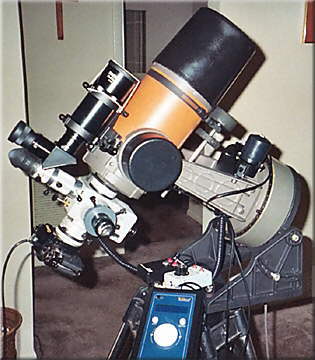
You don't need a large, fancy, expensive scope to use VSI products. Mark's vintage Celestron C5 was created around 1977. Note the orange tube. He also had the optics refurbished, added a computer, dec and focus motors, and installed an oversize finderscope, not to mention a Slider 2 optical manifold. These modest upgrades re-created a portable scope with very functional and frustration-free astroimaging capabilities. A lot of astro-fun for a reasonable investment.

Ken Crawford's Imaging Train and Rancho Del Sol Observatory
Located in Diamond Springs, CA
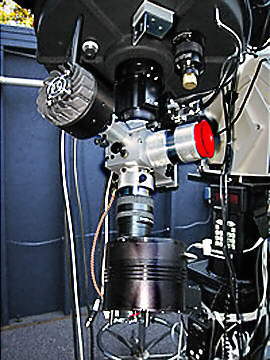
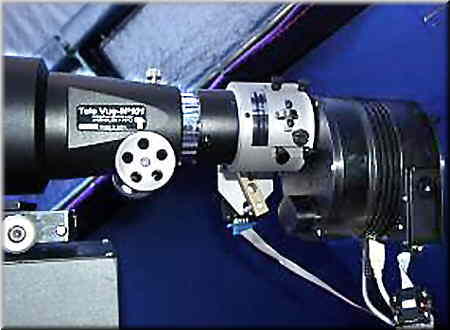
The above close-in picture shows Ken's C14 visual back, Slider 2 optical manifold, SBIG 10XE main imaging camera, and his 237a guiding camera at the pick-off mirror. If you want to find out more about his unique, multi-scope observatory, visit his web site.

The Leeward Community College Observatory
Located in Pearl City, Hawaii
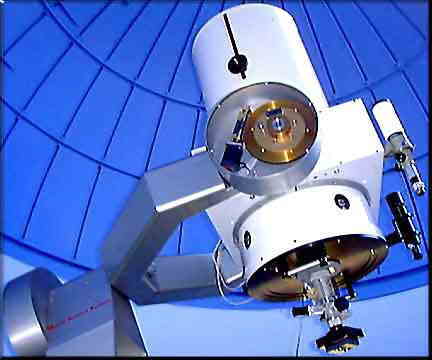
This college observatory recently installed a 20" Cassegrain scope, fitted with Byers drives in both axis, from John Stiles of Optical Guidance Systems (OGS). Note the VSI Super Power Focuser (now discontinued) and the VP Slider optical manifold at the lower right in the picture above. Also note the 12" diameter custom mounting plate above the focuser, which was machined by VSI, according to John's specs. With this custom threaded mounting plate installed, now any standard 3.25"-16tpi Meade/Celestron large format threaded accessory (not just VSI stuff) can be simply and securely screwed onto the visual back of the OGS scope. The observatory's director, Fritz Osell, has purchased many other VSI products for use on this scope and others at his observatory complex, like the VSI remote controlled Dual Filter Wheel (discontinued) and the VP Flipper DFM (which is also discontinued).
Lawrence Livermore National Labs & VSI
A Unique Application of a VSI CYCLOID Rotator
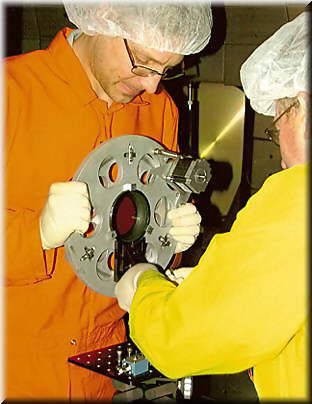

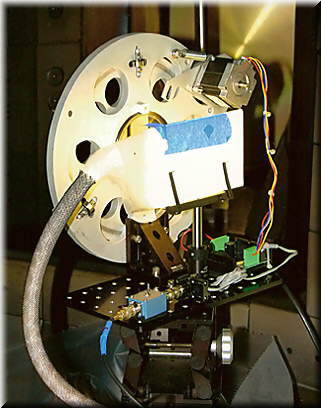
The Letter from Lawrence Livermore National Labs
February 24, 2007
Re: Thanks for quick response on Cycloid Auto Rotator
Dear Paul,
A couple of months ago, we inquired about your Cycloid Auto Rotator (now discontinued) for a project which was on an extremely tight deadline. We are researchers on a plasma machine called the DIII-D Tokamak which is a "star on earth" - a fusion machine that is being developed as an energy source (it replaces the heat source in an electrical plant which is currently using fossil fuels). We want to Thank You for your quick response and your solid product which enabled us to make a tight deadline.
Roughly once a year, the tokamak (a vacuum vessel about the size of a house) is opened for calibrations for a couple of months. We were calibrating an optical instrument that can measure the electrical current profile of the tokamak plasma. This "Motional Stark Effect" (MSE) diagnostic does very precise measurements of polarized light. Just before starting the calibration, a member of our team came up with a new technique that involved spinning an optic (a large "quarter wave plate") in front of a fixed polarizer - this provides both linearly and circularly polarized light to the system. Unfortunately, we had less than a week to put this system together, and so we started looking for a way to quickly make this polarization generator.
I use one of your off-axis guiders in my (personal) astrophotography endeavors. However, I wasn't up to date on the availability of your Cycloid rotators. One of the members of the team found your Cycloid during a search on the web, and he asked me if I knew anything about Van Slyke Instruments! I called you the next day, and you indicated that this wasn't really made to rotate at 60 rpm, but perhaps we could modify the basic design. (This was Wednesday, and I knew you normally only ship on Friday). We called our purchasing people and asked them to rush the order. You assembled a unit for us and shipped it overnight on Friday - using Fedex as opposed to your normal USPS. You even tested the unit to see how fast it would turn with the existing drive mechanism.
When it arrived, we made a simple modification of the drive mechanism and had the unit running at over 60 rpm in short order. A precision stepping motor was used to keep the rotation speed exact. We started calling this "The Wheel of Fortune" and it was used to successfully calibrate our diagnostic. It rotated at a very precise rate with the stepping motor (we took FFT's of the modulated light).
We want to Thank You for your quick response, your "can do" attitude, and for working with us with a "non-standard" request. The basic strength and quality of your product made it possible for us to modify it for our test. I'm enclosing a few pictures of the "Wheel of Fortune."
Sincerely,
Steve Allen, PhD (pictured above)
Lawrence Livermore National Labs At General Atomics
San Diego, CA

Tony Hallas' Astroimaging Train
Located in Foresthill, California


If you don't know who Tony and Daphne Hallas (pictured above right) are, you're new to astronomy, or never browsed an issue of Sky & Telescope or Astronomy magazine. Their pictures have graced the pages, and covers, of these magazines for many years. Their efforts are what we all aspire to achieve. Other accomplished astroimagers pale by comparison. To have the world's foremost astroimager use your equipment is the ultimate compliment. The astroimaging train above left (from left to right) comprise an SBIG USB ST-10E CCD camera for astroimaging, a Versa-Port Slider 2 optical manifold for target acquisition and guiding, and a SBIG STV for tracking (top center). The scope is a 14.5" f/8 astrographic Classical Cassegrain on a 12" Schaefer mount. To see the best astroimages ever taken from a ground based telescope, visit Tony's web site.

The Vega-Bray Observatory located in Benson, Arizona
The scope is the second largest Maksutov in the United States
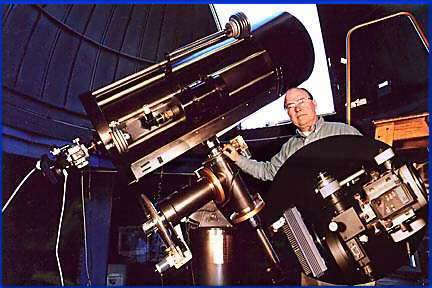
Dr. Ed Vega is pictured above next to his 20" f/9.5 Maksutov telescope, which is mounted on a German equatorial mount with a 16" Byers drive. The lower right inset is a close-up of Ed's imaging train featuring a VSI [digital] Super Power Focuser (now discontinued) remotely controlled from an attached warm room.
Dr. Ed Vega passed away on December 16, 2003. He was diagnosed with brain cancer on November of 2001 and has been battling, and [supposedly] winning the battle, as there had been no recurrence. However, due to the fact that he had been receiving chemotherapy during these past two years, his resistance to other illnesses was low. He contracted pneumonia, which his system could not fight. The astronomical community has lost a comrade - an amateur astronomer of great renown. He will be deeply missed by myself and all who knew him, and his observatory at Skywatcher's Inn. - PVS

Chuck Kollar's Copernicus Kintaro Observatory
Located in Pittsburgh, Pennsylvania

This very advanced amateur installation is housed in a 3-meter Observa-DOME. The scope is a Celestron C14 Schmidt-Cassegrain mounted on a restored Cave German equatorial mount retrofitted with Byers drives in both axis. Positioning is completely computer controlled. To eliminate lateral image shift induced by his primary focusing mechanism, Chuck has installed a VSI Analog SPF, and is using a Versa-Port Slider 2 optical manifold with his ST-7 CCD camera.

An imaging train close-up belonging to world famous astroimager Gregory Terrance
Visit his web pages at http://www.frontiernet.net/~gregoryt
Gregory Terrance's spectacular images have graced the pages of Sky & Telescope and Astromony magazines for many years. Above is Gregory's imaging train attached to his piggybacked refractor. The imaging train consists of a Versa-Port Slider 2 optical manifold and a very large format CCD camera. Note the dial indicator (upper right) - an ingenius, and simple way to achieve "ballpark" focus every time.
Telescope Creations by Paul B. Van Slyke
NOTE: The following telescope installations and creations are only the biggest & best out of many dozens of telescope projects, since childhood. There will be no more efforts on my part [like the following], for personal reasons, so this is my meager epitaph. Over the years, I have actually enjoyed building telescopes more than observing through them. I can only hope my legacy, such as it is, will help to instill a new generation of Amateur Telescope Makers. Unfortunately, we are becoming a dying breed. - PVS

Black Forest Observatory's 30" Cassegrain Telescope
BFO was the Largest Observatory in Colorado
Black Forest Observatory's 30" Cassegrain is attached to a massive German equatorial mount, driven by a 20" Byers drive. Starting from the skyward side, a custom 2.75" motorized rack & pinion focuser adorns this instrument, which was built many years ago by Paul Van Slyke. Next in line is a custom, large format Versa-Port Flipper, a VSI motorized [dual wheel] 2" filter wheel, and an SBIG ST-6 CCD Camera.
FYI, the scope was sold, dismantled and transported to Gunnison, Colorado in 2002, where it resides [nonfunctional, but reassembled for display] in the Gunnison bank, until funding can be raised to construct a proper observatory for the scope. If you are interested in "The BFO Story," click on picture at left. - PBVS

A Unique 10" Fork-Mounted RC Scope
Designed and Built by Paul B. Van Slyke
Project Started: 10-09-95, Completed: 11-10-01
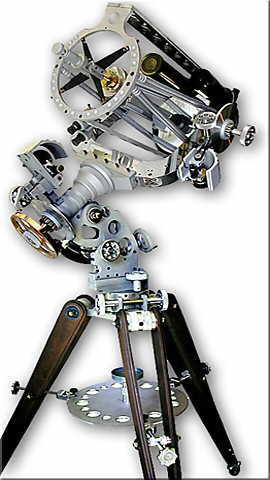
This Ritchey-Cretien scope was built to satisfy my demanding obsession for quasi-perfection. In the beginning, this was to be a scope like no other, and with all the features no other possessed. Although I do know that nothing is perfect, least of all this scope, you must understand that the creative effort itself is the importance of this mission - not the end product. Traveling a path, without knowing the destination, is why we do anything, even though curiosity sometimes "kills the cat" and delays our inevitable journey, either to the creation of a simple telescope, or to a literal journey to the stars themselves (see "Why Space?" link for info on the importance of reaching the stars). The fun is in the striving for that unachievable perfection, maintaining full knowledge that you will never attain that which you truly desire - the quest will be reason enough. A person, who [literally] tries to achieve perfection, never accomplishes anything. Perfection is not possible, so this person [inevitably] never reaches his goals in life. This is sad, because there are a lot of people like this in the world. My philosophy on this debilitating attitude is simple, just do it! What emanates from your effort should be at least satisfactory, and satisfactory is good enough for Vulcans. If people wish to glorify the outcome of your efforts, then so be it. If you are interested in more info on this scope, click on picture at right. - PBVS
An Innovative 17.5-Inch Binocular
by Paul B. Van Slyke
Amateur Telescope Making Journal, Issue #1, Fall 1992
Reprinted in the New "The Best of ATMJ" ©2003 (vol. 1 of 2, page 19)
This dual telescope was one of the first really large (700 lbs.) giant binoculars created in the days when light-grasp fever was engulfing the astronomical community. It had two unique features over the other creations of the era. 1) It was all-metal construction, where all the big binos back then were made of wood. Personally, I don't consider telescopes made from wood to be true telescopes. They are dysfunctional and expedient Dobsonians, etc. Is this a snobbish attitude? No, because I grew up in the days before John Dobson's "nature" revolution. Back then, all telescopes were made of metal, period! Yes, I'm a dinosaur, and proud of it! 2) This binocular/telescope could be converted into a multi-mirror telescope by converging the two independent light cones into one. More on this accomplishment in the article. If you are interested in more info on this binocular scope, click on picture at left. - PVS
Four-Speed 17.5-inch Newtonian
Sky & Telescope Magazine, February 1986
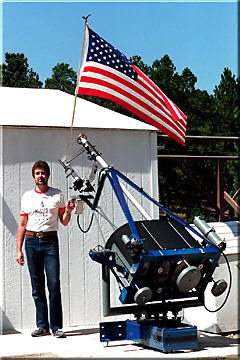
Before the creation of Black Forest Observatory's 30" Cassegrain, I designed and built this smaller Newtonian scope on a German equatorial mount, with worm drives in both axis and multiple speed control from tracking to slewing. The truss tube assembly even rotated, at the push of a button, to provide a comfortable viewing angle at the Newtonian focus. This scope was temporarily housed in a small roll-off roof observatory until the 20-foot domed observatory, that would eventually house the 30-inch Cassegrain, could be completed. I sent the pictures and article to S&T and, to my surprise, they published it almost immediately. Click on picture at right to access article. - PBVS

![[return]](rulephon.jpg)


![[return to home]](bareturn.jpg)
![[top of the page]](topage.jpg)