
Van Slyke Instrument's Machine Facilities
Mount any VSI Focuser to any Scope - Not just Meade & Celestron
AP, Borg, DFM, OGS, RC Optical, Takahashi, TMB, Vixen, etc., etc. - Just Call VSI


AP, Borg, DFM, OGS, RC Optical, Takahashi, TMB, Vixen, etc., etc. - Just Call VSI


How can the finest astronomical instruments, available anywhere on Planet Earth, be so reasonably priced? Simple, Van Slyke Instruments (VSI) is not a large, fancy CNC (Computer Numerical Control) job shop with high salaried designers, engineers, machinists and staff. Most important, VSI markets their own products (wholesale direct to you) so there are no dealer commissions, etc. that can seriously inflate a product's final price. You'll never see a VSI product marketed by anyone except Van Slyke Instruments. VSI has no large overhead or high operating expenses.
All products are handmade on digital gearhead lathes and power feed digital mills, one at a time, by Paul Van Slyke. High accuracy [Tru-Set] 6-jaw chucks, with 0.0002" run-out, are used to maximize product concentricity, and KURT mill vises (made in USA) with vise surfaces that are ground parallel to 0.0001" for more accurate milling operations. VSI also uses Starrett (made in USA) and Fowler (made in Switzerland) digital height gauges for product layout, and high quality YUASA (made in Japan) rapid indexing heads for extremely accurate dividing of circular stock. FYI, the lower right picture above is the layout and indexing stage in a production run of focusers. And, most products are personally hand signed (engraved) by Paul Van Slyke.
VSI products are metal construction throughout (except when other materials are structurally more practical or superior to metal). VSI uses a unique and distinctive finish on all products. The finish process is called glass beading, which is the same durable finish that is applied to high-quality rifles and handguns to give them [what I call] an "expensive looking" appearance. Glass beading also hardens the surface of the metal, similar to anodizing, but without harming the environment (see "Questions & Answers FAQ" link for more info). The finishing process is applied, using glass beads propelled at high velocity inside a direct pressure blasting cabinet, that actually cold works (hardens) the surface of the metal.
The value of your investment in Van Slyke products will appreciate over the years, because they are built to perform through the next millenium and beyond. For over 25 years, Paul Van Slyke has been creating ingenious astronomical products in his machine shop, and has been building telescopes for over 40 years. His reputation for manufacturing the highest quality instruments is known to be beyond compromise and without comparison.
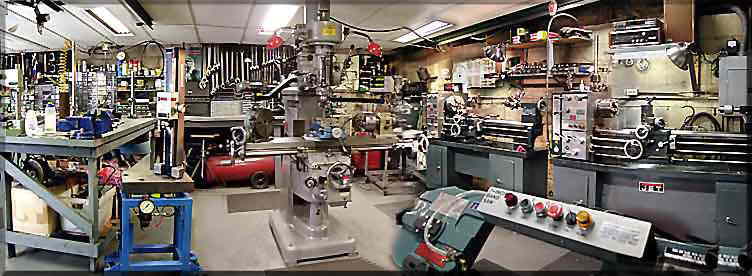
From left to right above are: Trimos/Fowler 24" digital height gage, with 0.0001" resolution, on an isolation air bladder lift granite block and [blue] stand; Index 2hp vertical mill with XYZ axis power feeds, and XYZ axis Mitutoyo digital readouts with resolutions to 0.0005"; two 14" x 40" gear head lathes equipped with Anilam and Sony digital readouts, with resolutions to 0.0002" and European 6-jaw TRU-SET chucks. All the above digital mills and lathes have ultra-precise glass scales installed for repeatable accuracies. Foreground above right is a 7" x 12" metal cutting band saw with semi-automatic hydraulic feed, lift and clamp functions.

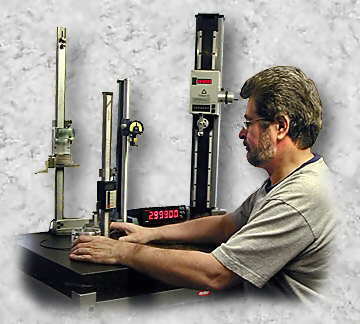
VSI's machine shop is equipped with an 18" x 36" steel table topped with a 4" thick black granite block flat to 0.0001 inches. On this granite platform we use various high-accuracy height gages for layout and testing. From right to left is a Trimos/Fowler 24" digital height gage (made in Switzerland) accurate to 0.0001 inches, a Brown & Sharpe 12" height gage with gold faced, ultra-high precision German analog comparator gage with increments of fifty millionths of an inch, a Starrett 12" digital height gage (made in USA) with separate digital readout box, and an 18" Vernier height gage. The above instruments are used to perform various layout procedures before machining, and quality control testing after machining when ultra-high precision is required.

The Following are Examples of VSI Custom Machinings and Special Mountings
and are Available, if I have the Time? Remember, I am a One-Man-Band
The following are critical product reviews, similar to a product or movie review written by a movie critic, etc. We must not forget why we call them critics - their job is to criticize other people's work. Unlike me, they are paid big bucks for finding fault in others. My expertise is derived from a lifelong pursuit of perfection in telescope design, functionality and solidity - simplicity being the most important and hardest to achieve.
You might call me a telescope product critic, but I have definitely been called worse. I offer these sincere reviews for your enlightenment and edification only. I do not write to promote my products over others. I do not need promotion because my 25+ year reputation is impeccable. My products have always spoken loudly on their own merit. Most evolved people appreciate my honesty and the extra effort I apply to VSI products and website. A few don't.
Understand that these critical reviews are not meant to denigrate or demean any one person or business. They are simply written as honestly and truthfully as possible from a structural design point of view. If the product is structurally sound, then there is really nothing to criticize. Obviously, the people that engaged my services would not have done so, had they not discovered these flaws before me, and there would be no review.
If a product is design/structurally challenged, then critical words are written to explain the flaws, and people should not take offense. They should put their egos aside and pursue the purity of truth in design. What is, is irrefutable. I am disappointed that these people would deny/mask their mistakes, rather than learning from these critical reviews, and simply moving on to a better understanding of what is, and is not. Persons, with egos that bruise easily, have asked me to remove my critical reviews from this web page, and I have obliged their request because I try to be honorable in life. Unfortunately, these omissions, requested by lesser people, are a loss to all of us seeking truth in design.
Conversely, my products are critized all the time. If I played osterich, you would have lost the benefit of my services long ago. I have always respected my critics and considered their utterings, applying their expertise, where applicable. This is the single, most important reason VSI still survives in our depressed economy. I like constructive criticism! - PBVS

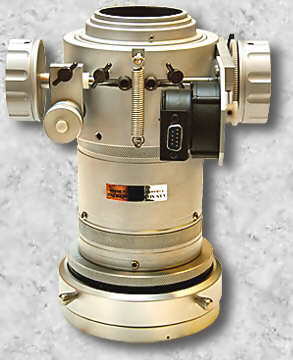
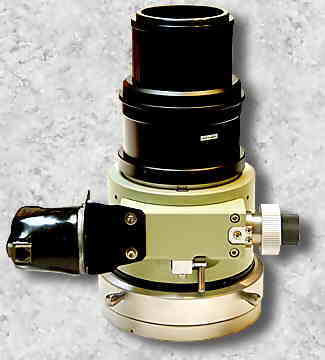
 Kirk's retrofit was necessary to
eliminate the wobbling and flexure inherent in all Takahashi focuser's moving
tubes. A big 4" focuser, like the Takahashi, doesn't mean it is solid. Remember
the days before Crayfords, when rack & pinions were "King?" Not anymore!
Well, the Japanese never got the word(s) - "The King is dead, long live the
Crayford."
The Japanese have also created a plan (consciously or unconsciously) to limit your use of "other than Takahashi products." The first problem creates so many thread sizes that no one could easily mount anyone elses product(s) to Tak scopes. Luckily, VSI can flout this philosophy by simply custom machining any thread size that Takahashi throws out there, or anyone elses for that matter (see COMMENTARY bottom of this web page)..
Their captain's wheel has a M120-1mm output thread that accepts [the threaded housing of] the Tak focuser. The output of the focuser's moving tube is M96-1mm and the end of the black extension tube is M76-1mm (Why are they all different? Rhetorical.), so shortening your profile by removing the black extension tubes requires another shorter M76 Tak adapter - need we say dysfunctional. How many times have I harped about simplicity and versatility. Tak doesn't seem to understand those concepts. And there is a third thread, which is different from the other two, between the two [different diameter] sections of the black extension tube(s) - Aaaaargh! I didn't even go there, so I can't tell you about it.
The two custom machined VSI output converters (below right) actually provide three different focuser outputs, if you count nothing as an output, which is the M96 thread cut directly into the VSI and Tak focuser's moving tubes. The larger diameter (top) output converter screws onto the custom VSI focuser's moving tube, and converts to VSI's proprietary 3.1" output converter format so you can use all of VSI's output converters offered at our website. The custom machined (bottom) output converter drops into the larger converter's 3.1" format and offers the male output thread of the M76 black extension tube. Now Kirk can easily convert to other non-Tak format by simply switching to a different 3.1" VSI output converter, like SBIG's proprietary 2.156"-24tpi CCD output converter (Item A31ST), or the industry standard 2"-24tpi SCT threaded output, or the M42-0.75mm T-thread standard, etc (go to FOCUSERS link, click on OUTPUT CONVERTERS link, scroll down the page for more).
The second problem is caused by the simple fact that all Takahashi focusers are rack & pinion. The third (more serious and subtle) problem is leveraged flexure issues caused when Takahashi shortened their tube assemblies to accommodate extended imaging trains used in the USA and other countries. Consequently, if you don't need the shortened backfocus for your imaging train stuff, you must use their [black] extension tubes that screw onto the end of their focuser's moving tube (see right picture, top of this section). Even a Crayford would strain [but not flex] under an extended leveraged load (like an SBIG STL11000, etc.). This leveraged extending actually increases your applied load at the focuser's moving tube many times beyond the actual load. Simply put, Takahashi's backfocus "bandaid" corrections put the extensions on the wrong end of the focuser.
 Of course, this tube shortening
process was prompted when Takahashi received all the complaints about limited
backfocus from US and others. In Japan, no one uses "stuff" between the camera
and the scope (i.e. optical manifolds, rotators. filter wheels, off-axis
guiders, AOs, focal reducers, etc.). Multitudinous guide scopes have always
been the rage in Japan. Would the Japanese ever adopt an American idea or
product? Well, there are no American cars in Japan. We'll leave ideaologies
and politics to others.
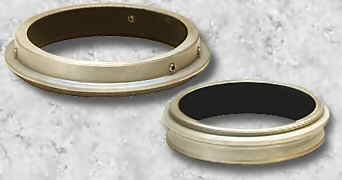
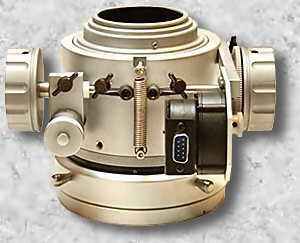
Kirk originally came up with the idea to put the extension tubes behind the focuser, and that is exactly what I did (see pictures above left). I built out from the Tak's original "captain's wheel" ring, shown in most pictures with the short spokes opposed by 90 degrees around the ring. The custom machined converter ring, shown just above the captain's wheel in the (exploded rings) picture above left, converts from the wheel's M120-1mm thread pitch to VSI's 3.8" proprietary circular flange cut. Above the converter ring are two large-diameter extension tubes, one 1.25" and one 3" long section. The two sections together offer extension versatility and provide the overall distance necessary to match the Tak's original mechanical profile length and focal point. The picture below right is the custom VSI focuser docked directly to the converter ring without the extension tubes. This shortened installation provides a whopping 4.25" of additional backfocus for your imaging train stuff.
 You might say, why not just machine
the same extension tubes and dock the original Tak focuser instead of a VSI
focuser? The reason was briefly addressed above, but I believe further
clarification is necessary. I can't heap enough accolades on the infamous
zero flexure properties of the Crayford - properly designed and built (see
WARNING bottom of this web page).
A Crayford is the only focuser type that can boast zero-flexure - period!
This VSI singular gigantic beast is a larger-format, custom machined focuser designed and built from scratch, but because it emulates VSI's 3" Toad, it is not as expensive as a "from-scratch" designed and built focuser, like the $5000 one I built for a 36-inch Newt a while back (see GIANT...... below). Most people don't realize that a custom machined focuser has to be designed first. A custom focuser's design process is time intensive and must be included in the overall price.
Suffice it to say, the VSI focuser has the same outside diameter as the original Tak focuser - 5 inches. This custom focuser uses the same hardware and only resembles a stock VSI Toad, because it was upwardly designed using the CAD drawings for a 3" Toad. Only the general dimensions were expanded, keeping the price down compared to a scratch build. It is difficult to see the difference in these pictures, but placing a stock 3" Toad next to this behemoth would easily reveal its more massive proportions. You're thinking, "What is the price?" You'll need to email or call me for that "number."
As with Tom's Tak E180 below, I [first] tried to use a production focuser off-the-shelf but the Tak's substantial internal corrector lens cell, which protrudes 4 inches beyond the threaded coupling for its captains wheel, was too large in diameter (3.2") and length to fit inside a stock 3" Toad's moving tube. FYI, all VSI focusers, unlike some others, are rated by the true inside diameter of the moving tube (internal clear aperture).

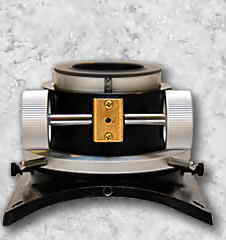

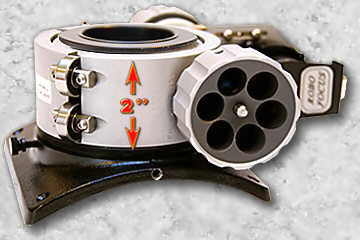
Tom told me that the astrograph's stock R&P focuser (pictured above left) had backlash, rotation problems and rocked with the weight of his SBIG STL11000 CCD camera. He didn't mean that his Tak focuser "rocks" as in really good. He meant that literally. The travel tube wobbled back and forth under the load of the STL11000. Totally unacceptable! He also told me that he asked Takahashi for a remedy to the focusing wobbles and they told him to shim the focuser's moving tube. Really! OK! Tom called me and wanted his wobbly Tak focuser replaced with a VSI 3" focuser using his existing Tak radius block (casting shown above and below with focusers attached). I needed to meet four of his criteria before I could begin his custom order. One, he wanted a focuser that would use his Robo-Focus autofocus system, which he already had on another scope. That was easy. Note that his existing Tak focuser was not upgradeable to Robo-Focus control. At least not at a reasonable cost, and why would you upgrade a flexure-ridden focuser to motor control anyway. Two, it needed to have zero flexure under the load of his STL11000. That was also easy since every VSI focuser is guaranteed to have zero flexure under any load. Three, he needed the Tak's coma corrector lens, shown above right behind the red arrow, to screw into the VSI focuser's travel tube, as it did with his existing Tak focuser. That was the last easy task. And four, to have the same 2" profile as his current Tak focuser. Now that was not easy, because VSI focusers generally have slightly less than a 3" profile. A focuser with a 2" profile is not physically possible, and still maintain a rock-solid, stable focuser.
Most people don't realize that it is not really possible to create a stable focuser with a 2" profile. There are a lot of commercial focusers out there in Astroland with a 2" profile, but they are not stable. To drive the point home, I say again, "It is physically and mechanically impossible to create a commercially viable stable focuser with an actual 2" profile." However, there are "sneaky" ways to achieve a 2" profile by utilizing hidden profile within the physical parameters of the optical path itself. Tom's radius block consumes slightly less than 1-inch of profile, which is where I found that hidden profile necessary to provide a visible profile of 2 inches, as shown in the pictures.
To back-track just a bit, the guys at Takahashi have their priorities confused. They put the [smallest] minor-axis of the diagonal mirror first, without considering that an astrograph needs its first priority to be a rock-solid focuser, so it can support a hefty CCD camera. We know that you need a small minor-axis diagonal to provide the smallest center obstruction possible. You do this in a Newt-type astrograph by keeping the focuser's profile as short as possible. However, if you compromise the focuser's stability in doing so, then a smaller obstruction becomes a secondary consideration (Sorry! That was too obvious). They compromised the focuser by prioritizing the smallest center obstruction and destroyed the overall functionality and primary purpose of the astrograph - stable astroimaging. From my comments in the above paragraphs, we now know that the shortest profile focuser is not always the most stable. Takahashi should have never installed an obsolete rack & pinion focuser in an astrograph. Yes, I said obsolete. The true Crayford is the only focuser design that can provide a travel tube with absolute zero flexure. You may have noted that I said, "can provide." There are a lot of so-called Crayford focusers that are not true Crayfords, and even the true Crayfords that use real radial ball-bearings are not adequate to create a zero flexure focuser. Although most of them claim that distinction, they can't achieve that distinction because of flawed overall design concepts and the use of miniature slot-car bearings that are designed for speed, not precision. For more on this subject, click on the FOCUSERS link, then go to the 3" or 2" TOADS link, and scroll down the page to the section called "Miniature Slot Car Bearings vs Large-Diameter Precision Bearings."
To accommodate the existing physical parameters of the 3" Toad focuser, the internal diameter of Tom's radius block was threaded to accept machined external threads that were custom cut into the 3" Toad focuser's [4.25" external diameter] housing. By not using the Tak radius block's existing external [Tak's so-called captain's wheel] threads, and cutting custom new internal threads, you could utilize the internal profile of the radius block to hide the additional profile the Toad focuser required. This internal threading also allowed the Toad focuser to be rotated, and locked in any rotational position using the 4 new tapped holes in the radius block. Two are metal set screws for locking, two have Nylon thumb screws for tensioning and all four are opposed by 90 degrees (see picture below). The use of any combination of the four lock-downs provide solid rotational positioning.
FYI, Tom was suppose to have a modified [now discontinued] 3" MacroGlide, but it's parameters simply would not accommodate the Tak radius block or meet all of his four requirements. I also tried to fit Tom with a modified production VSI focuser but that was not to be either. A custom machined VSI focuser had to be machined from scratch. Why do I mention this? Because an off-the-shelf production focuser (Toads) is much less expensive compared to a one-off custom machined focuser designed and built from scratch.

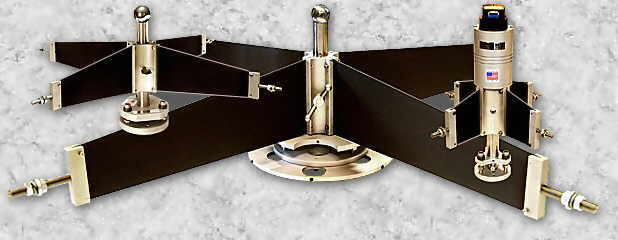
 When you place an order for a VSI
spider, it is custom built from parts assembled in our machine shop. It will
typically ship on our next shipping date just like any VSI production product
because many of the parts are on the shelf ready for finishing and assembly.
However, every spider requires some parts built from scratch, like spider
vanes and mirror holders, etc. Some are completely built from scratch, like
the giant 50-inch spider shown above.
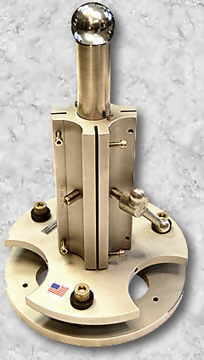
Pictured at left is a close-up of the 50-inch spider's 8" long hub and collimatable head assembly, shown without the vanes and mirror holder. For physical size reference, the 2" polished aluminum ball screws onto the end of the 1.5" [diameter] solid stainless steel shaft and the collimatable disks are 10" in diameter each.
Both the smaller spiders shown above are basic SH3s, without mirror holders. One is a manual spider for a 16" scope (left) and the other is a motorized spider for a 10" tube (right). I say tube, and not scope, because it was to be installed in a NASA/JPL bench test aparatus for beta testing something else. Note that SH2s (not shown) can't be motorized.
No matter what your requirements, VSI builds your spider from assembled parts and custom scratch-built parts. The prices quoted at our SPIDERS link, for the SH2, SH3 or SH4 include custom vane lengths to fit your tube assembly. Mirror holders are not included in the SH base price (usually around $150 extra for smaller standard sizes). Mirror holders are not necessary for most applications because your secondary mirror can be directly glued to the collimatable head, bypassing the need for an additional holder.
POLICY NOTE: All VSI products that are custom built from parts, or from scratch, are not returnable/refundable under any circumstances. Of course, all VSI products (custom or production) include VSI's unconditional lifetime warranty. See POLICIES link, Custom Orders section, for more details.


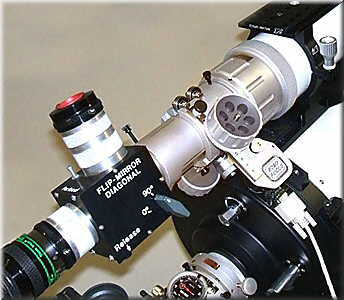
First, Bruce wanted to replace his existing 2" format focuser on his William Optics (WO) refractor with one of my 2" TOADLOADERS. That would allow him to use my [exclusive] manual MicroDial and Robo-Focus stepper motor control. Note that both focuser assemblies above have their moving tubes fully extended to illustrate travel range. The picture [above right] is the new visual back/focuser assembly installed on Bruce's scope. More info and pictures are at my USER INSTALLATIONS link, Bruce Anderson's 12" SCT and Astro-Physics 1200 Mount.
As you may, or may not know, a stock 2" TOADLOADER is basically designed to be a secondary focuser for CATs, SCTs, etc. so they only have 1" of travel. Bruce needed a primary focuser that had at least 3" of travel like his existing focuser. To shorten the story, he got 4" of travel, because I always offer my focusers with an optional longer travel tube for Newts, refractors, or any application that requires more than 1" of travel.
Bruce also had a second request. Asthetically, he didn't like the WO tapered visual back (shown above, far left). FYI, a refractor's visual back is usually just a simple double threaded ring that reduced the refractor's tube diameter to accommodate the focuser's smaller diameter housing. For some reason, WO decided to extend their visual back with a taper. Might have been a [too short] tube length error that WO corrected by using an extended visual back? Maybe they just thought it looked cool? Whatever the reason, Bruce wanted it gone.
Well, the results of our collaboration are shown above, before and after. I designed and custom machined the new extended visual back to match the 2" TOADLOADER's "gun" knobs. Below shows the breakdown of the two main visual back parts. One being the extension section, that is threaded and screws directly onto the back of Bruce's WO tube (female 113.5mm diameter x 1mm thread pitch shown below, right), and the short ring being the threaded insert that locks into the visual back using a flange cut and three SS set screws opposed by 120 degrees. With a separate ring, you can change it out for other thread configs without replacing the entire [expensive] visual back section. This insert ring has the Meade standard 3.25"-16tpi male thread. Since all 2" TOADLOADERS have this female thread cut into their base housings, all Bruce has to do is screw on his 2" TOADLOADER to the new visual back assembly, shown above right. Having a separate [rotatable] ring also allows more convenient rotational positioning.

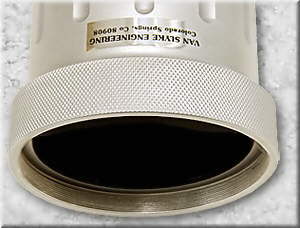


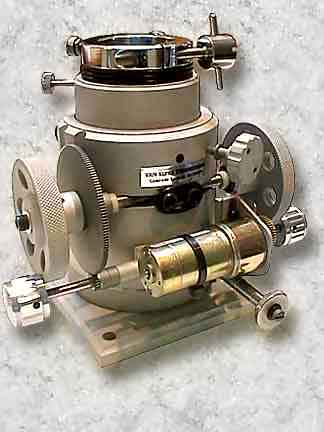
This custom built GIANT focuser now resides on a 36" Newtonian telescope in Ireland. The pictures do not impress this GIANT focuser's true size so, to help, note the 1.25" eyepiece (lower left picture above). This early focuser is very similar in operation and size to our newer 3" TOADLOADERS. In fact, if you removed the built-in drawtube, they would be almost identical, except that the TOADLOADERS have a much shorter overall profile. The base plate is 6" by 7" and the focuser housing is 4.5" in diameter. This Crayford focuser has 3" of travel and a built-in drawtube to provide an additional 6" of extended backfocus. Note the dual focusing knobs for coarse and fine focus control and a gear reduced Pittman motor. It's the same type of motor that Meade uses to drive it's 16" SCT mount (overkill on torque). The drawtube not only has dual thumb screws but a TRUE compression locking mechanism for added equipment security. See pictures and info about this giant scope at VSI's INSTALLATIONS link.


The customer possesses two Meade refractors, a 102 and a 178, with stock Meade focusers which he wanted VSI to upgrade to our [now discontinued] MasterGlide focusers. Needless to say, the Meade focusers left a lot to be desired, but we'll discuss that later. Al sent me the focusers by mail so I could machine and custom fit new visual backs with the Meade 3.25"-16tpi male threaded output. This way he could use any Meade large format accessory, including VSI TOADLOADERS, and it provided his two refractors with much more versatility and functionality. Above left is a picture of the stock Meade integrated visual back/focuser, and above right is the custom visual back with removable (now discontinued) MasterGlide focuser (model M4). Below left is a picture of the custom machined visual back, with the focuser unscrewed, ready for installation on Al's refractor and the custom 8" long extension drawtube (below center) to provide all the back focus anyone could ever desire.
The lower right picture needs some explaining. I examined both Meade visual back focusers when I received them, just for curiosity sake. I was ready to be impressed by the utter size of the Meade focusers until I turned them over and looked inside. The pot metal casting looks massive from the outside, which I'm sure is Meade's plan, but the thin wall castings and the [less than] 1/8" thick wall on the rack tube was less than adequate for even casual low power observing of the heavens. When I checked the rack tubes for "play" they both moved back and forth about 1/16" - totally unacceptable! When I looked closer, I saw adhesive tape on the focuser housing's three internal support ribs. These three lengths of tape along the focuser housing "skids" (for want of a better word) are what supports (I use this word loosely, literally) the rack tube. It's really an ingenious idea! Meade can now take credit for producing the cheapest focuser that is humanly possible to create.
Both focuser motors were a "catch 22" installation if I ever saw one. The above stock Meade focuser motor looks beefy and strong and, in fact, it is. They even used metal spur gears. Whoa! I was trying to be impressed with at least the motor drive but, alas, I was seriously disappointed again. The motor shaft has a slip-clutch mechanism attached to the spur gear that needs to be adjusted so that you can simultaneously remote and manually focus the telescope. Another great Meade idea, but one that failed miserably. I tightened the clutch so the motor could move the rack tube, and it worked well, but when I tried to focus manually (slip the friction clutch) the shaft would not turn, so I loosened the clutch so the shaft could be turned with the focusing knob and then the motor's clutch would not engage the shaft. No matter what I did, the mechanism would not work as intended, one or the other, but not both. This is such an easy, simple and inexpensive fix too.
Al's other refractor focuser had a JMI focusing motor attached. I couldn't figure out why there were no knobs for manual focusing on the focuser, just a motor on one end, and a bare shaft on the other. Then I looked at the motor/shaft coupling and realized that the motor shaft was "hard wired" to the focusing shaft. Ah, no need for a knob on the other end of the shaft since you can't manually focus anyway. No disengage, no slip-clutch, no disconnect, no nothing. How totally disfunctional! Again, a common sense, easy and inexpensive fix. Don't get me wrong. I'm not complaining. I'm informing. This is wonderful news for VSI sales. - PBVS
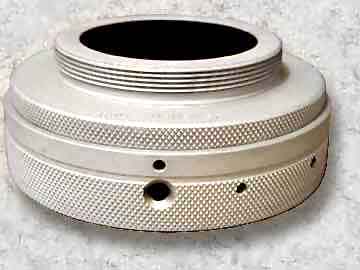
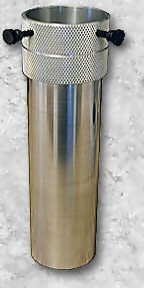


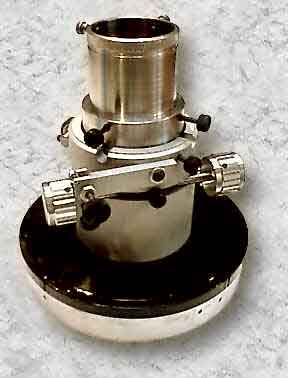
A special MasterGlide 2 focuser (discontinued), with a special drawtube, was custom hard mounted (but removable via three hex head bolts) to Ed Vega's 6" refractor back plate. Dr. Ed Vega also has an early Super Power Focuser on his 20" Maksutov (see VSI's "User Installations" link for more info on Ed's "Big Mak").
Dr. Ed Vega passed away on December 16, 2003. He was diagnosed with brain cancer on November of 2001 and has been battling, and [supposedly] winning the battle, as there had been no recurrence. However, due to the fact that he had been receiving chemotherapy during these past two years, his resistance to other illnesses was low. He contracted pneumonia, which his system could not fight. The astronomical community has lost a comrade - an amateur astronomer of great renown. He will be deeply missed by myself and all who knew him, and his observatory at Skywatcher's Inn. - PBVS
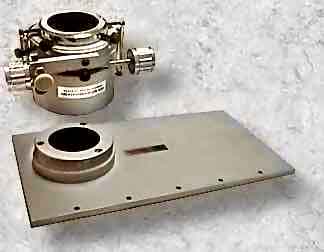
Another one of Ed's scopes is a folded refractor that a friend of his built for him, but Ed wanted the best focuser he could get for his new folded refractor so he thought of VSI. He detached the rear (aluminum) plate from his new folded refractor (pictured above) and sent it to VSI for my thoughts and recommendations. The above is what I came up with.
I believe that "detachability" or "interchangeability" is a mark of a thoughtful telescope designer who has his customer's best interests in mind. So I suggested that Ed have me machine a 3.25"-16tpi threaded docking adapter ring, just like the visual backs on Meade/Celestron SCTs, and mount the threaded adapter ring on his existing back plate. Then all he had to do was pick any VSI 2" focuser model and "just screw it on." Down the road, this standardized docking ring will allow the utilization of any standard Meade/Celestron SCT accessory. Good idea, even if I do say so myself. - PBVS

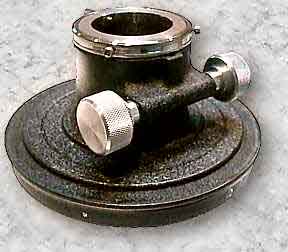
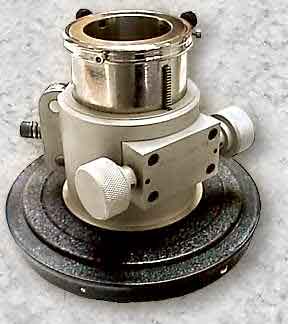
This very early vintage Astro-Physics (AP) refractor back plate/focuser combination was sand-cast from pot-metal, like the department store refractors. The above left picture is the original AP focuser back plate assembly before retrofit. The above right pictures are after retrofit. This is a very cheap and expedient way to create a refractor's "rear-end" but it leaves a lot to be desired in focuser operation, quality, longevity and [especially] functionality. I believe that all focusers, no matter what type of optical system they reside on, should be removable by whatever means possible (i.e. unscrew, set screws, etc.) so that upgrades, especially for imaging, can be easily installed.
The "play" between the focuser's rack tube and housing was about 5 thousandths of an inch so you could literally wiggle the rack tube back and forth in the housing - not good for even general observing, and totally useless for imaging. The "play" in the pinion shaft [shifted laterally] was about 10 degrees because the integral cast housing that holds the pinion rod (pictured above left) had no bearings or bushings at all - the pinion rod was rotating on the pot-metal casting itself so, over time, the wear became intolerable for the user. The old focuser housing was less than 1/8th inch thick - not enough "metal" to support a 2" format diagonal and eyepiece, let alone an extended imaging train. Even the broach slot was cast (not cut) and off the center axis by almost 5 degrees.
Of course, no denigration to AP is intended in this critical analysis. In the beginning, we all "cut corners" to make a buck, and we try to learn from our past mistakes. Even some of my early creations come back to haunt me, from time to time. It is my adament opinion that Astro-Physics creates the finest refractors in the world, even better than Takahashi. And Meade, I won't go there.
The back plate was salvaged (with it's original, vintage black wrinkle finish paint) by cutting off (with a lathe cut-off tool) the old integral focuser housing and machining an inner flat area on the outside of the back plate (see above right picture). This particular casting was so bad that the inner area of the casting was off by 1/4" in thickness from side to side. Needless to say, this surface was also machined flush with the front surface of the back plate. The center perforation was off by a bunch too, so the back plate was re-chucked (in a Bison 6-jaw Tru-Set chuck) and machined to center the perforation to within "2 tenths" (that's machine slang for 2/10,000"). The old focuser's rack tube was also salvaged [to save customer $ and utilize the AP's original focal reducer that fit inside the rack tube] and incorporated into a new, basic R&P Super Power Focuser housing with a separate pinion block using bronze [oil-impregnated] bushings to support the pinion shaft.
To deviate a bit, a quality bronze bushing will provide a zero tolerance, extremely concentric and durable pinion shaft support, and is preferred [by myself] over the more expensive ball-type bearings. However a high-precision ball-type bearing is also quite adequate to support critical control mechanisms like pinion rods or [even] worms for telescope drives. I prefer a bronze bushing because of concentricity considerations. Only a single "eccentricity" needs to be considered when mounting a pinion shaft in a bronze bushing, the shaft to bushing contact point. But four separate contact surfaces need to be considered when mounting any shaft using ball bearings - 1) the pinion shaft to bearing, 2) the balls to inner race, 3) the balls to outer race, 4) and the concentricity of the balls themselves. Both mounting methods have been used in critical support areas by Ed Byers and Thomas Mathis to mount their very high precision worm gear drive systems. A good example is my 30-inch Cassegrain mount which has a 20" Byers drive in RA, with it's worm mounted in ball-type bearings, which I was surprised to find when I purchased it. However, the scope's Dec drive gear is a Mathis drive, with its worm mounted in bronze bushings, which I believe will provide more accurate, concentric operation and support of the worm.
Another [what I consider] necessary upgrade was the [now discontinued] SPF's Railroad Bearing Stabilization System which provides a guaranteed zero image shift literally forever, no matter how much use or wear is imparted on the focuser itself. Other small, but important, upgrades were added, like a thumb screw to lock the rack tube (the original focuser had none), and the old single [skinny] thumb screw lock on the original rack tube (see above center) was replaced with large double thumb screws opposed by 90 degrees (which provides optimum lateral holding power) for added security. Then the new hybrid focuser was hard mounted on the old back plate with 3 Allen head hex bolts opposed by 120 degrees and countersunk into the rear of the back plate. A shoulder was machined on the inner rear of the focuser's housing to match the center perforation diameter of the back plate to guarantee proper centering of the focuser. Hex bolt concentricity and alignment was accomplished using an ultra-high precision YUASA rapid-indexing head. - PBVS
WARNING: Be aware that all [so-called] Crayford focusers, are not really Crayford focusers. Deceptive advertising by many dealers, trying to take advantage of the Crayford's reputation, offer Crayford-type, Crayford-like or Crayford-style focusers that have very little to do with the true Crayford design. NO radial ball bearings, NO zero-flexure, NO fluid motion, NO ultra-tactile sensitive control, NONE of the above functions that make the true Crayford the finest precision focuser on Planet Earth. These non-Crayford focusers typically use plastic pads to simulate Crayford bearings and other inferior construction techniques that deminish the Crayford name. Only a focuser that uses four precision radial ball bearings (not slot car bearings) can [rightfully] be called a Crayford focuser. - PBVS
COMMENTARY: There are a myriad of non-standard proprietary adapters from individual manufacturers - no industry standards exist. Why can't these manufacturers adopt the closest standard set by their predecessors? Look at the three Tak, TMB and Vixen adapters (90, 85 & 88mm). They are all within 2 or 3 mm of each other. Why? Look at the two Celestron and Meade large-format adapters. One is 3.29" and one is 3.25" in diameter. Look at the two AP and Meade 2.7" adapters. Meade changed the existing 2.7" AP thread standard from 24 to 16tpi, but the 2.7" diameter remained the same. Again, why? Both of these non-conformity issues are Meade's fault for not adopting the existing Celestron and Astrophysics standards already established. And now SBIG has created a new 2.156"-24tpi proprietary thread standard for their large-chip CCD camera. Watch and see, no one else will adopt their thread configuration. They'll all create their own proprietary standard and you'll have a half-dozen different diameters and thread sizes that are within a few millimeters of each other, again. Do these manufacturers care about their customer's inconvenience and added expense? Never even crossed their minds! This kind of "diametrical dysfunction" creates confusion and costs you money, and it's totally unnecessary. Just wanted you to know, so you can take your own action - or not? - PBVS
![[return to home]](bareturn.jpg)